UX Ideation Tips Raw Studio
Ux ideation tips raw studio – UX Ideation Tips: Raw Studio – Ever felt stifled by traditional brainstorming sessions? Imagine a space overflowing with tactile materials, collaborative energy, and the freedom to let your creativity run wild. That’s the power of a “raw studio” approach to UX ideation. This isn’t just about sticky notes and whiteboards; it’s about tapping into a more visceral, intuitive design process that unlocks fresh perspectives and innovative solutions.
Get ready to dive into a world where unconventional materials meet digital tools, and collaborative energy fuels the creation of truly groundbreaking user experiences.
We’ll explore the core principles of a raw studio environment, examining how it fosters collaboration and ignites creativity. From setting up your own physical or digital raw studio to mastering effective brainstorming techniques and integrating diverse materials, we’ll equip you with the tools and strategies to transform your UX ideation process. We’ll cover everything from choosing the right materials and tools to effectively communicating your design ideas and gathering valuable feedback from stakeholders.
Prepare to unleash your design potential!
Understanding “Raw Studio” in UX Ideation: Ux Ideation Tips Raw Studio

Source: cloudfront.net
The “raw studio” approach to UX ideation prioritizes a free-flowing, unconstrained environment that encourages rapid prototyping and experimentation. It’s a departure from the more structured, formal methods often associated with traditional design processes. This approach emphasizes the immediate generation of ideas and solutions, focusing on the core concepts rather than polished presentations in the early stages.A raw studio environment fosters creativity and collaboration through its inherent flexibility.
The lack of rigid structure allows team members to easily interact, share ideas, and quickly iterate on designs. The emphasis is on rapid prototyping and testing, using readily available materials and tools. This iterative process allows for a faster exploration of design possibilities and a quicker identification of potential issues.
Benefits of a Raw Studio Setting, Ux ideation tips raw studio
Compared to traditional, more formal methods, a raw studio setting offers several key advantages. The speed of ideation is significantly increased due to the reduced emphasis on polished presentations and detailed documentation in the early stages. The collaborative nature of the environment encourages diverse perspectives and cross-pollination of ideas, leading to more innovative solutions. The iterative nature of the process also allows for more effective problem-solving, as issues can be identified and addressed quickly.
This agility allows for faster adaptation to changing requirements or user feedback.
Examples of Raw Studio Setups
Raw studio environments can be adapted to both physical and digital spaces. A physical raw studio might consist of a large whiteboard, sticky notes, markers, various craft supplies, and comfortable seating arranged to facilitate collaboration. A digital raw studio, on the other hand, might leverage online collaborative whiteboards like Miro or Mural, alongside digital prototyping tools like Figma or Adobe XD.
The key element in both scenarios is the emphasis on accessibility and ease of use, allowing for quick and easy experimentation.
Sample Layout for a Physical Raw Studio Space
The following table Artikels a sample layout for a physical raw studio space. The design emphasizes flexibility and collaborative interaction.
| Area | Description | Equipment/Furniture | Notes |
|---|---|---|---|
| Central Collaboration Zone | Large open area for brainstorming and group work. | Large whiteboard, multiple tables, comfortable chairs, sticky notes, markers, pens | Easily reconfigurable to suit different group sizes and activities. |
| Prototyping Area | Dedicated space for building and testing prototypes. | Cutting mat, scissors, craft supplies (cardboard, paper, etc.), prototyping kits | Should be well-lit and have ample workspace. |
| Presentation/Review Area | Space for presenting and reviewing work. | Projector, screen, comfortable seating | Could be integrated into the central collaboration zone or be a separate area. |
| Storage Area | For storing supplies and materials. | Shelves, cabinets, drawers | Keep frequently used items easily accessible. |
Ideation Techniques for a Raw Studio Environment

Source: dribbble.com
A raw studio, with its unpolished, flexible nature, presents a unique opportunity for uninhibited brainstorming. The lack of formal structure can actually foster creativity and encourage diverse perspectives. However, harnessing this energy requires the right approach and techniques. This section explores effective ideation methods tailored for this dynamic environment.
Effective Brainstorming Techniques for Raw Studios
Choosing the right brainstorming technique is crucial for a productive session. Different methods cater to different thinking styles and group dynamics. The following techniques are particularly well-suited to the raw studio’s informal atmosphere.
So, you’re diving into UX ideation, maybe even using a raw studio approach for that authentic feel? To really get your ideas out there, though, consider how you’ll share your process – check out this awesome guide on getting it on with youtube for some killer video tips. Then, armed with those video skills, you can showcase your UX ideation tips raw studio workflow and reach a wider audience!
- Brainwriting: This silent, written brainstorming method minimizes the dominance of vocal participants and allows everyone to contribute their ideas independently. Participants write down their ideas on paper, then pass their papers to the next person, who builds upon the existing ideas. This is ideal for introverted team members or situations where quick, individual ideation is desired.
- SCAMPER: This technique uses a checklist of prompts (Substitute, Combine, Adapt, Modify, Put to other uses, Eliminate, Reverse) to stimulate creative problem-solving. It’s a structured approach that can be easily adapted to any project and is very effective in guiding less experienced teams.
- Worst Possible Idea: This counter-intuitive approach encourages participants to generate the worst possible solutions to a problem. By exploring these “bad” ideas, the team can often identify underlying assumptions and unlock more innovative, realistic solutions. This can be a fun and engaging way to break through mental barriers.
- Random Word Association: Select random words (from a dictionary, a hat, or a word generator) and use them as springboards for generating ideas. This unexpected approach can help overcome mental blocks and spark unexpected connections.
- Storytelling: Encourage participants to create narratives around the problem or opportunity. This can help to visualize potential solutions and understand the user’s journey more deeply. This is particularly helpful for developing empathetic design solutions.
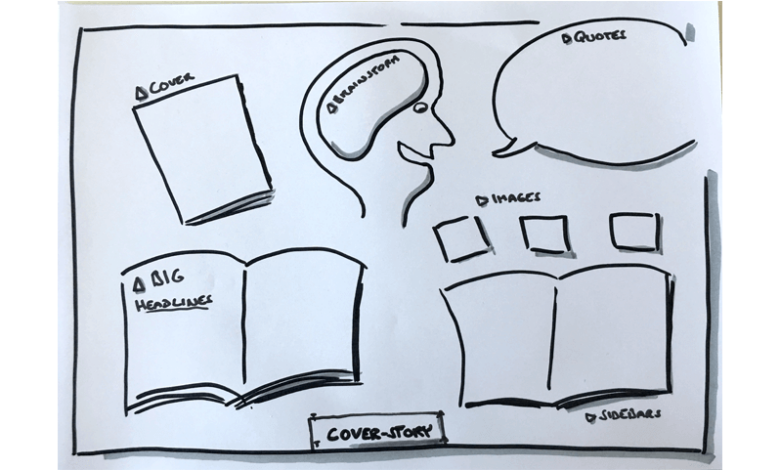
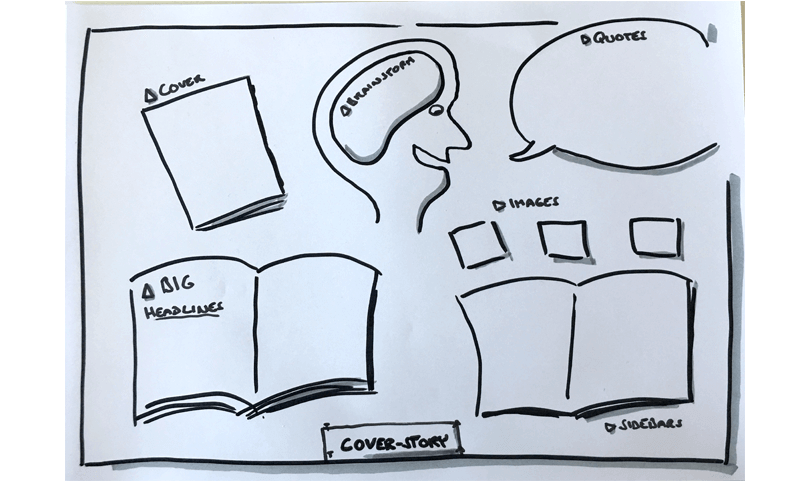
Utilizing Visual Aids in Raw Studio Ideation
Visual aids are indispensable in a raw studio environment. They facilitate quick communication, enhance collaboration, and provide a tangible record of the ideation process.Whiteboards, large sheets of paper, and sticky notes are excellent tools. Whiteboards allow for free-flowing sketching, mind mapping, and quick revisions. Sticky notes enable individuals to contribute ideas independently, which can then be easily grouped, categorized, and rearranged on the board.
This visual organization makes it easy to identify patterns, connections, and potential synergies between ideas. Consider using different colored sticky notes to categorize ideas based on priority, feasibility, or other criteria. The visual representation also helps to maintain focus and momentum throughout the session.
Comparing Brainstorming Methods in a Raw Studio
Different brainstorming methods offer unique advantages in a raw studio setting.
| Method | Strengths in Raw Studio | Weaknesses in Raw Studio |
|---|---|---|
| Mind Mapping | Visually organizes ideas, promotes connections. Works well on a whiteboard. | Can be less effective with large groups, requires a facilitator to maintain structure. |
| Sketching | Quick, visual, allows for rapid prototyping, good for visual thinkers. | May require some artistic skill, can be difficult to interpret for non-visual thinkers. |
| Role-Playing | Enhances empathy, allows for testing different perspectives. | Can be time-consuming, requires strong facilitation, may not be suitable for all problem types. |
Facilitating a Raw Studio Ideation Workshop: A Step-by-Step Guide
A well-structured workshop is essential for maximizing the effectiveness of a raw studio ideation session.
- Define the Challenge: Clearly articulate the problem or opportunity that the team will be addressing. Provide context and background information.
- Select an Ideation Technique: Choose a technique that aligns with the team’s size, experience, and the nature of the challenge.
- Set Ground Rules: Establish guidelines for respectful communication, idea generation, and participation. Encourage a safe space for experimentation.
- Generate Ideas: Dedicate ample time for brainstorming, using the chosen technique. Encourage active participation from all members.
- Organize and Prioritize Ideas: Categorize and prioritize the generated ideas based on feasibility, impact, and alignment with project goals.
- Document and Share Findings: Record all ideas and decisions. Share the results with relevant stakeholders.
Essential Materials and Resources for a Raw Studio Ideation Session
Having the right materials ensures a smooth and productive session.
- Large whiteboard or flip chart
- Assortment of colored markers
- Sticky notes (various colors)
- Pens and paper
- Projector (optional, for presentations or visual aids)
- Snacks and drinks
- Timer
Utilizing Diverse Materials and Tools in a Raw Studio
A raw studio, with its emphasis on unrefined spaces and tactile exploration, offers a unique environment for UX ideation. Leveraging a variety of materials and tools, both physical and digital, can significantly boost creativity and lead to more innovative solutions. The key is to embrace the unexpected and allow the interplay of different mediums to spark new ideas.
Unconventional Materials for UX Ideation
The beauty of a raw studio lies in its ability to inspire through unexpected sources. Stepping outside the typical whiteboard and sticky note routine can unlock fresh perspectives. By incorporating unconventional materials, we can tap into a more visceral and intuitive design process.
- Sculpting Clay: The malleability of clay allows for rapid prototyping of 3D forms and user interfaces, facilitating quick iteration and exploration of different shapes and spatial relationships. Imagine sketching out a complex mobile app navigation flow in clay, allowing for immediate adjustments and a tangible representation of the user journey.
- Natural Elements (Wood, Stones, Leaves): Incorporating natural materials introduces organic textures and forms that can inspire unique design solutions. The rough texture of a piece of wood might suggest a new approach to a website’s visual hierarchy, while the smooth surface of a river stone could inspire a minimalist app design.
- Fabric Scraps: Different fabrics offer a wide range of textures and colors, allowing for quick exploration of visual aesthetics and user interface elements. Layering fabrics can visually represent different information layers in a website or app design.
- Recycled Materials (Cardboard, Plastic Bottles): Using recycled materials not only promotes sustainability but also encourages creative problem-solving. The repurposing of everyday objects can lead to unexpected design solutions and foster a more conscious approach to design.
- Construction Materials (Bricks, Pipes): These materials can provide a strong visual foundation for brainstorming sessions, perhaps representing the structural elements of a complex system or the building blocks of a new product. The visual impact of these robust materials can stimulate more robust and creative thinking.
Enhancing Creativity Through Diverse Textures and Materials
The tactile nature of physical materials plays a crucial role in the creative process. The act of physically manipulating materials engages different parts of the brain, fostering a more intuitive and holistic approach to design. The interplay of textures—rough against smooth, soft against hard—can trigger unexpected associations and lead to innovative solutions. For example, the contrast between the smoothness of glass and the roughness of burlap might spark an idea for a website with a sophisticated yet rustic aesthetic.
The sensory experience enhances the ideation process, moving beyond the purely visual to a more comprehensive understanding of the design.
Digital Tools Complementing a Raw Studio
While the raw studio emphasizes physical interaction, digital tools remain essential for refining ideas, creating detailed prototypes, and sharing designs. The integration of both physical and digital tools creates a powerful synergy.
- Digital Whiteboarding Software (Miro, Mural): These tools allow for collaborative brainstorming and the organization of ideas generated in the raw studio. Images of physical prototypes can be easily uploaded and annotated, facilitating a seamless transition between the physical and digital worlds.
- 3D Modeling Software (Blender, SketchUp): These tools allow for the creation of detailed 3D models based on initial physical prototypes, facilitating a more precise representation of the final product.
- Prototyping Software (Figma, Adobe XD): These tools allow for the creation of interactive prototypes, testing user flows, and gathering feedback. The physical sketches and models from the raw studio can serve as the foundation for these digital prototypes.
Seamless Integration of Digital Prototyping Tools
The key to effective integration lies in a fluid workflow that leverages the strengths of both physical and digital environments. Digital tools should not replace the raw studio experience but rather enhance and extend it. For instance, low-fidelity sketches and models created in the raw studio can be quickly digitized and refined using vector graphics editors, leading to high-fidelity prototypes.
Workflow: Integrating Physical and Digital Tools
The following workflow demonstrates how to effectively combine physical and digital tools in a raw studio UX ideation process.
- Brainstorming and Sketching: Begin by using physical materials (e.g., clay, paper, fabric) to brainstorm and sketch initial ideas. This allows for free-flowing, intuitive exploration.
- Physical Prototyping: Create rough, tangible prototypes using readily available materials to test basic functionality and user flows. This might involve constructing a cardboard mockup of a product or using clay to model a 3D interface.
- Digital Capture and Refinement: Photograph or scan the physical prototypes. Import these images into a digital whiteboarding tool (e.g., Miro) to organize and annotate ideas. Refine sketches using vector graphics software.
- Digital Prototyping: Use prototyping software (e.g., Figma) to create interactive prototypes based on the refined digital sketches. This allows for more precise testing of user flows and interactions.
- User Testing and Iteration: Conduct user testing using the digital prototypes. Gather feedback and iterate on the design based on user insights. This iterative process can seamlessly loop back to the raw studio, with physical adjustments made based on digital testing results.
Visual Communication and Storytelling in a Raw Studio
The raw studio, with its emphasis on immediacy and tactile exploration, presents a unique challenge and opportunity for visual communication. Effectively conveying design ideas requires a shift from polished presentations to a more visceral, narrative-driven approach. Sketches become the primary language, and the ability to weave a compelling visual story is key to securing buy-in and inspiring collaboration.Effective communication in a raw studio relies on the power of visual storytelling to quickly and efficiently convey complex UX concepts.
This means moving beyond simple wireframes and embracing a richer, more evocative approach that utilizes the immediacy of the raw studio environment to its fullest. The goal is to create a shared understanding and generate excitement around the design vision.
Sketching Techniques for Raw Studio Ideation
Sketches in a raw studio should be quick, expressive, and iterative. Avoid overly detailed renderings; instead, focus on capturing the essence of the interaction and the user’s journey. Use different line weights to emphasize key elements and create visual hierarchy. Experiment with varying levels of fidelity—sometimes a rough sketch is more effective than a meticulously detailed drawing.
Consider using different colored markers to represent different user groups or system states. The key is to communicate the core idea clearly and efficiently.
Creating Compelling Visual Narratives
Visual narratives in a raw studio often take the form of a series of interconnected sketches, each representing a stage in the user journey. These sketches can be arranged on a whiteboard, a large sheet of paper, or even directly onto the walls. Adding annotations and brief descriptions to each sketch helps to further clarify the intent and context.
Consider using arrows and connectors to show the flow between different screens or interactions. The overall goal is to create a visual flow that is easy to follow and understand.
Translating Raw Studio Sketches into Digital Prototypes
The transition from raw studio sketches to digital prototypes is crucial for further development and testing. High-fidelity prototypes are not always necessary at this stage; a low-to-medium fidelity prototype is often sufficient to test core interactions and gather user feedback. Tools like Figma, Adobe XD, or even simple PowerPoint can be used to translate sketches into interactive prototypes.
Remember to maintain the essence of the initial sketches while adding the necessary level of detail for digital interaction.
Visual Communication Methods for Raw Studio Environments
Whiteboards, large sheets of paper, sticky notes, and even the walls themselves become canvases for visual communication in a raw studio. These tools allow for quick, iterative sketching and easy rearrangement of ideas. The collaborative nature of these methods fosters a sense of shared ownership and encourages open discussion. Consider using different colored markers to differentiate ideas or highlight specific features.
The flexibility and adaptability of these materials are crucial for a dynamic and evolving design process.
Illustrative Descriptions of UX Design Concepts
Here are three examples of UX design concepts described using evocative language, focusing on the user experience without relying on visual aids:
Concept 1: The Seamless Commute: Imagine a transportation app that anticipates your needs before you even think of them. It seamlessly integrates with your calendar, predicting your travel time and suggesting optimal routes based on real-time traffic and public transport schedules. A subtle haptic feedback guides you through the navigation process, and a calming soundscape soothes your journey, turning your daily commute into a moment of peaceful mindfulness.
Concept 2: The Personalized Learning Platform: Picture an educational platform that adapts to your individual learning style. It uses AI to analyze your strengths and weaknesses, crafting a personalized curriculum that keeps you engaged and motivated. Progress is tracked visually through an interactive, gamified dashboard, rewarding your achievements and offering tailored support when you encounter challenges. The platform feels like a supportive tutor, always ready to assist.
Concept 3: The Intuitive Recipe Manager: Envision a cooking app that transcends simple recipe storage. It intuitively organizes your recipes based on ingredients you already have, suggesting meals based on dietary restrictions and available time. Interactive shopping lists seamlessly integrate with your preferred grocery delivery service, and the app even offers step-by-step video tutorials for complex cooking techniques, making culinary adventures accessible to everyone.
Collaboration and Feedback in a Raw Studio Setting
Raw studio ideation thrives on collaboration. The energy of a shared space, filled with tangible materials and evolving ideas, fosters creativity but requires careful management to ensure productive teamwork and insightful feedback. Effective communication strategies and conflict resolution are key to harnessing the raw studio’s potential.
Successful collaboration in a raw studio hinges on clear communication, defined roles, and a shared understanding of the project goals. Open dialogue, active listening, and respectful debate are crucial for generating innovative solutions. The physical environment itself – the arrangement of materials, the availability of whiteboards, and the overall atmosphere – plays a significant role in facilitating these interactions.
Fostering Effective Collaboration and Communication
Establishing clear communication channels from the outset is paramount. This includes defining roles and responsibilities, agreeing on communication protocols (e.g., using a shared online platform for updates and file sharing), and scheduling regular check-ins to ensure everyone is on the same page. Visual aids, like mind maps displayed prominently, can help everyone track progress and understand the overall direction.
Encouraging active listening and providing opportunities for everyone to contribute their ideas, regardless of seniority, are vital for a truly collaborative environment. Consider implementing a “no idea is a bad idea” policy to foster a safe space for experimentation and brainstorming.
Gathering Constructive Feedback from Stakeholders
Gathering constructive feedback requires a structured approach. This begins with clearly defining who the stakeholders are and what their specific areas of expertise and interest are. Then, tailor feedback sessions to each stakeholder group’s needs and preferences. For instance, a quick, informal feedback session might suffice for some stakeholders, while others may require a more formal presentation with time for detailed questions and discussion.
Using visual representations of the ideas, such as mood boards or prototypes, can facilitate easier understanding and feedback. Asking open-ended questions, such as “What are your initial thoughts?” or “What aspects resonate most with you?”, encourages thoughtful responses. Finally, actively listen to feedback, taking notes and summarizing key points to ensure everyone feels heard and understood.
Managing and Resolving Conflicts
Conflicts are inevitable in collaborative settings. A proactive approach to conflict resolution involves establishing ground rules for respectful disagreement from the start. This might include agreeing to focus on the ideas, not the individuals presenting them, and prioritizing constructive criticism over personal attacks. When conflicts arise, facilitate open dialogue, encouraging each party to express their perspectives clearly and calmly.
The facilitator’s role is to guide the conversation towards a mutually acceptable solution, ensuring that all voices are heard and considered. If the conflict persists, consider bringing in a neutral third party to mediate.
Documenting and Sharing Ideation Outcomes
Comprehensive documentation is crucial for capturing the essence of the raw studio sessions. This includes photographs of the physical workspace, notes from brainstorming sessions, sketches, and prototypes. A shared digital repository, such as a cloud-based platform, facilitates easy access and collaboration. Regularly updated documentation ensures everyone stays informed and allows for easy reference during later stages of the design process.
A concise summary report, including key decisions and next steps, is invaluable for keeping stakeholders informed and ensuring project continuity.
Structured Feedback Session Process
A well-structured feedback session is essential for efficient and productive feedback gathering. The table below Artikels a sample process:
| Role | Responsibility | Timeline |
|---|---|---|
| Facilitator | Guides the session, ensures everyone participates, summarizes key points. | Throughout the session |
| Presenter | Presents the ideation outputs, answers questions. | 15-20 minutes |
| Stakeholders | Provide constructive feedback, ask clarifying questions. | 20-30 minutes |
| Note-taker | Records key feedback points and action items. | Throughout the session |
Last Word
Source: justinmind.com
Designing exceptional user experiences requires more than just technical skills; it demands a creative spark and a collaborative spirit. The raw studio approach, with its emphasis on tactile materials, visual storytelling, and collaborative energy, provides the ideal environment for fostering innovation. By embracing unconventional methods and integrating both physical and digital tools, you can unlock a new level of creativity and design truly groundbreaking user experiences.
So, gather your materials, invite your team, and prepare to unleash the power of the raw studio!
FAQ Corner
What if my team is geographically dispersed? Can I still use a raw studio approach?
Absolutely! A “digital raw studio” can leverage online collaboration tools like Miro or Mural to replicate the collaborative aspects of a physical space. Share digital sticky notes, sketches, and prototypes in real-time.
How do I handle disagreements or conflicting ideas during a raw studio session?
Establish clear ground rules for respectful discussion. Encourage open communication and active listening. Use visual aids to clarify different perspectives and find common ground. Remember, diverse opinions are valuable; the goal is to synthesize them, not eliminate them.
What’s the best way to document the outcomes of a raw studio session?
Take photos of your work throughout the session. Use a shared online document or whiteboard to capture key ideas and decisions. Assign someone to take detailed notes, focusing on key insights and action items.


