Best Menu Templates Google Docs Design Your Dream Menu
Best Menu Templates Google Docs: Creating the perfect menu is crucial, whether you’re running a trendy cafe, a sophisticated restaurant, or even planning a family gathering. Forget struggling with complicated design software – Google Docs offers surprisingly powerful tools to craft stunning, professional-looking menus with ease. This guide will walk you through creating menus that not only look great but also enhance your brand and leave a lasting impression on your customers (or family!).
We’ll cover everything from choosing the right template and incorporating images to ensuring accessibility for everyone.
From casual coffee shop menus to elegant restaurant spreads, we’ll explore various styles and techniques to bring your culinary vision to life. We’ll delve into the power of visual hierarchy, the magic of whitespace, and the art of selecting the perfect fonts and colors to create a menu that’s as delicious to look at as the food it showcases. Get ready to unleash your inner menu designer!
Google Docs Menu Template Features
Creating visually appealing and functional menus using Google Docs is surprisingly straightforward. The platform’s accessibility and built-in formatting tools allow for a wide range of design possibilities, from simple cafe menus to sophisticated restaurant offerings. Let’s delve into the key features that contribute to effective menu design in Google Docs.
Essential Features of a Well-Designed Google Docs Menu Template
A successful Google Docs menu template goes beyond just listing items and prices. It needs to be easy to read, visually appealing, and organized in a way that enhances the user experience. Key features include clear section headings (Appetizers, Entrees, Desserts, etc.), consistent formatting for pricing and descriptions, and appropriate use of whitespace to avoid a cluttered look.
Consider incorporating high-quality images to showcase your food if applicable. The overall design should reflect the brand’s identity and target audience.
Menu Styles Achievable in Google Docs
Google Docs offers remarkable flexibility in achieving diverse menu styles. A casual cafe menu might utilize a playful font, bright colors, and hand-drawn style graphics. Imagine a whimsical script font paired with a muted pastel background and simple icons representing each dish. Conversely, a formal restaurant menu could employ a classic serif font, elegant color palettes (e.g., deep reds, golds, or blacks), and high-resolution images of signature dishes.
A more modern restaurant might opt for a minimalist design with clean lines, a sans-serif font, and a focus on high-quality photography. The adaptability of Google Docs allows for seamless transitions between these styles, depending on the specific needs.
Utilizing Formatting Tools for Menu Enhancement
Google Docs’ formatting tools are crucial for creating impactful menus. Font selection plays a vital role: serif fonts (like Times New Roman or Garamond) project sophistication, while sans-serif fonts (like Arial or Helvetica) offer a modern, clean aesthetic. Color choices should align with the brand’s identity and the overall menu style. Strategic use of bolding, italics, and different font sizes helps highlight key information like prices and specials.
High-quality images of dishes significantly enhance visual appeal, making the menu more engaging and enticing. Proper use of whitespace (margins, spacing between items) improves readability and prevents a cluttered appearance.
Comparison of Popular Google Docs Menu Templates
The following table compares three hypothetical Google Docs menu templates based on features and ease of use. Remember that the specific features and ease of use will vary depending on the template’s design and complexity.
| Template Name | Key Features | Pros | Cons |
|---|---|---|---|
| Classic Restaurant Menu | Formal font, high-quality image placeholders, section dividers, customizable pricing | Elegant design, easy to customize, professional look | May require more design experience for optimal results, less suitable for casual settings |
| Modern Cafe Menu | Clean layout, sans-serif font, color blocks, simple icons | Modern and minimalist, easy to use, quick to create | Limited customization options for complex designs, may lack visual appeal for formal settings |
| Casual Bistro Menu | Handwritten font style (simulated), informal layout, playful colors | Fun and inviting, suitable for casual dining, easy to customize | May appear unprofessional for formal restaurants, limited image integration options |
Creating Effective Menu Layouts in Google Docs
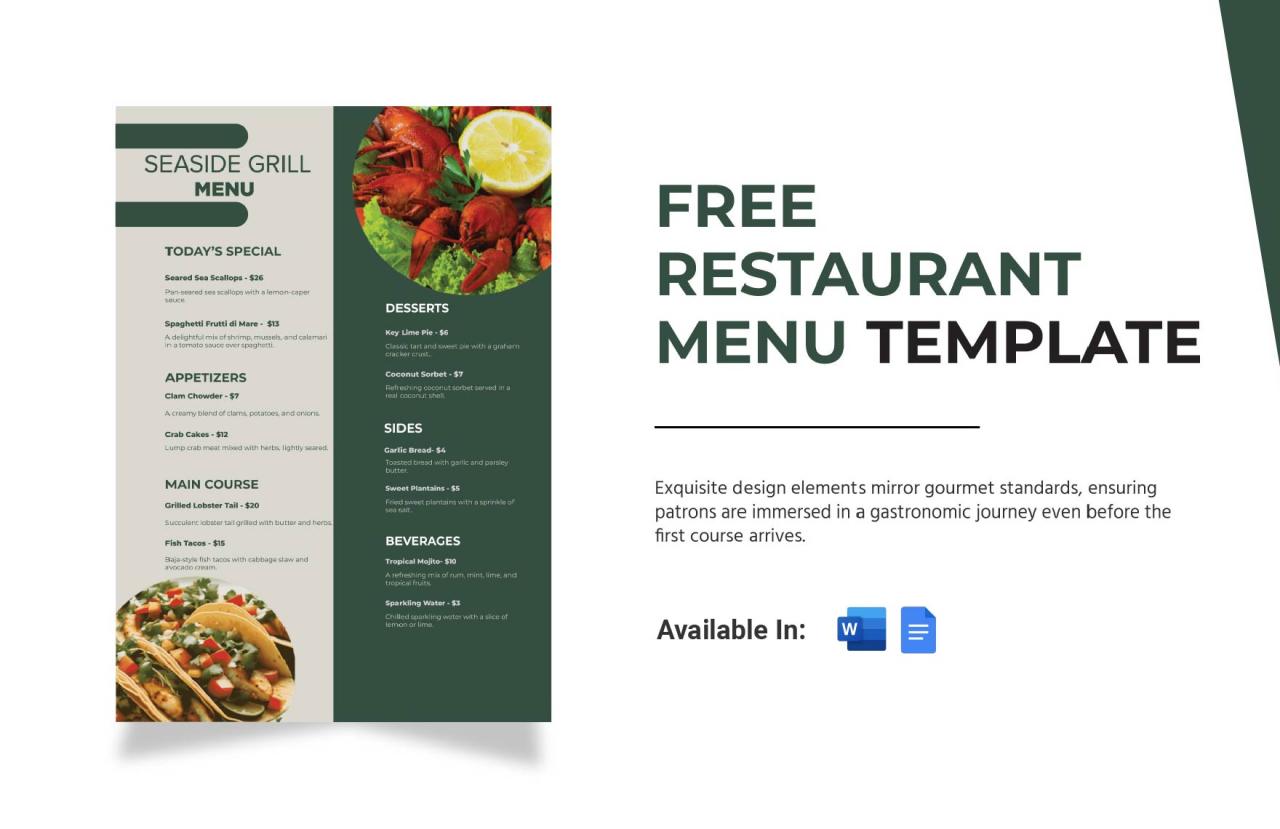
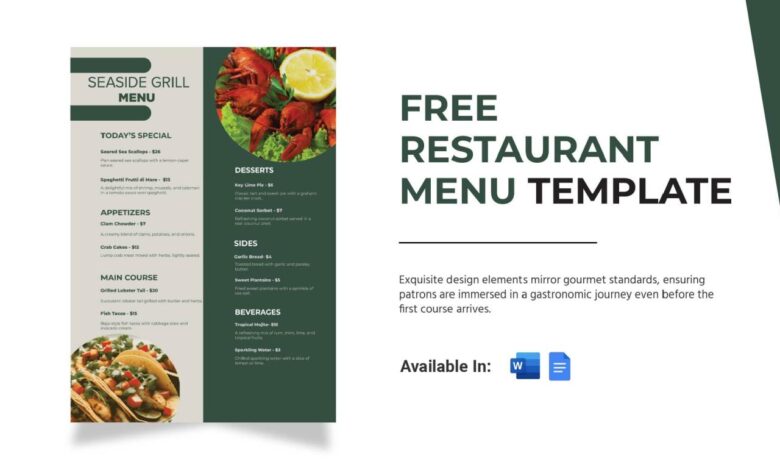
Source: template.net
Crafting a visually appealing and easily navigable menu in Google Docs requires understanding the principles of design. A well-designed menu isn’t just a list of items; it’s a visual communication tool that guides the reader efficiently through your offerings. This involves careful consideration of visual hierarchy, logical organization, and the strategic use of whitespace.
Visual Hierarchy and its Application
Visual hierarchy guides the reader’s eye through the menu, emphasizing important information and creating a clear path of navigation. In Google Docs, this can be achieved through font sizes, styles (bold, italic), and color. Larger, bolder headings draw attention first, followed by progressively smaller subheadings and body text. For instance, “Appetizers” could be a large, bold heading, with individual appetizers listed in a smaller, regular font underneath.
Consider using a consistent color scheme to further reinforce the hierarchy – perhaps a darker shade for headings and a lighter shade for the menu items themselves. Using contrasting colors can also highlight specific specials or items you want to promote.
Organizing Menu Items Logically and Aesthetically
Logical organization is key to a user-friendly menu. Group similar items together (e.g., appetizers, main courses, desserts). Consider the natural flow of a meal and arrange items accordingly. Aesthetically, this means ensuring a balanced layout. Avoid long, unbroken columns of text.
Instead, use columns, sections, or visual separators to break up the menu into digestible chunks. This makes the menu less overwhelming and easier to scan. Think about aligning items neatly – whether left-aligned, right-aligned, or centered – to create a sense of order and professionalism.
Whitespace and Visual Separators for Improved Readability
Whitespace, or the empty space around text and elements, is often underestimated but incredibly important. It prevents the menu from looking cluttered and allows the eye to rest. Use generous spacing between headings, sections, and individual menu items. Visual separators, such as lines or decorative elements, can further enhance readability by clearly dividing different sections of the menu.
In Google Docs, you can insert horizontal lines using the “Insert” menu or use tables to create visually distinct sections with built-in spacing. Remember that excessive use of visual separators can be just as detrimental as the lack of them, so use them sparingly and strategically.
So, I’ve been perfecting my restaurant’s menu using those awesome best menu templates Google Docs offers – they’re a lifesaver! To promote it, I’m diving into video marketing, and I’m finding this amazing resource on getting it on with youtube incredibly helpful for creating engaging content. Hopefully, this will drive more customers to try my delicious dishes, all planned out beautifully thanks to those Google Docs templates!
Sample Menu Layout in Google Docs
The following demonstrates a simple menu layout using headings, subheadings, and bullet points within a Google Doc:
The Cozy Corner Cafe
Appetizers
- Spinach and Artichoke Dip (V)
-$8.99 - Calamari Fritti – $10.99
- French Onion Soup – $7.99
Main Courses
Pasta
- Spaghetti Carbonara – $14.99
- Linguine with Clam Sauce – $16.99
Entrees
- Grilled Salmon with Roasted Vegetables – $22.99
- Chicken Piccata – $19.99
Desserts
- Tiramisu – $7.99
- Chocolate Lava Cake – $9.99
(V) denotes vegetarian option
Adding Visual Elements to Google Docs Menus
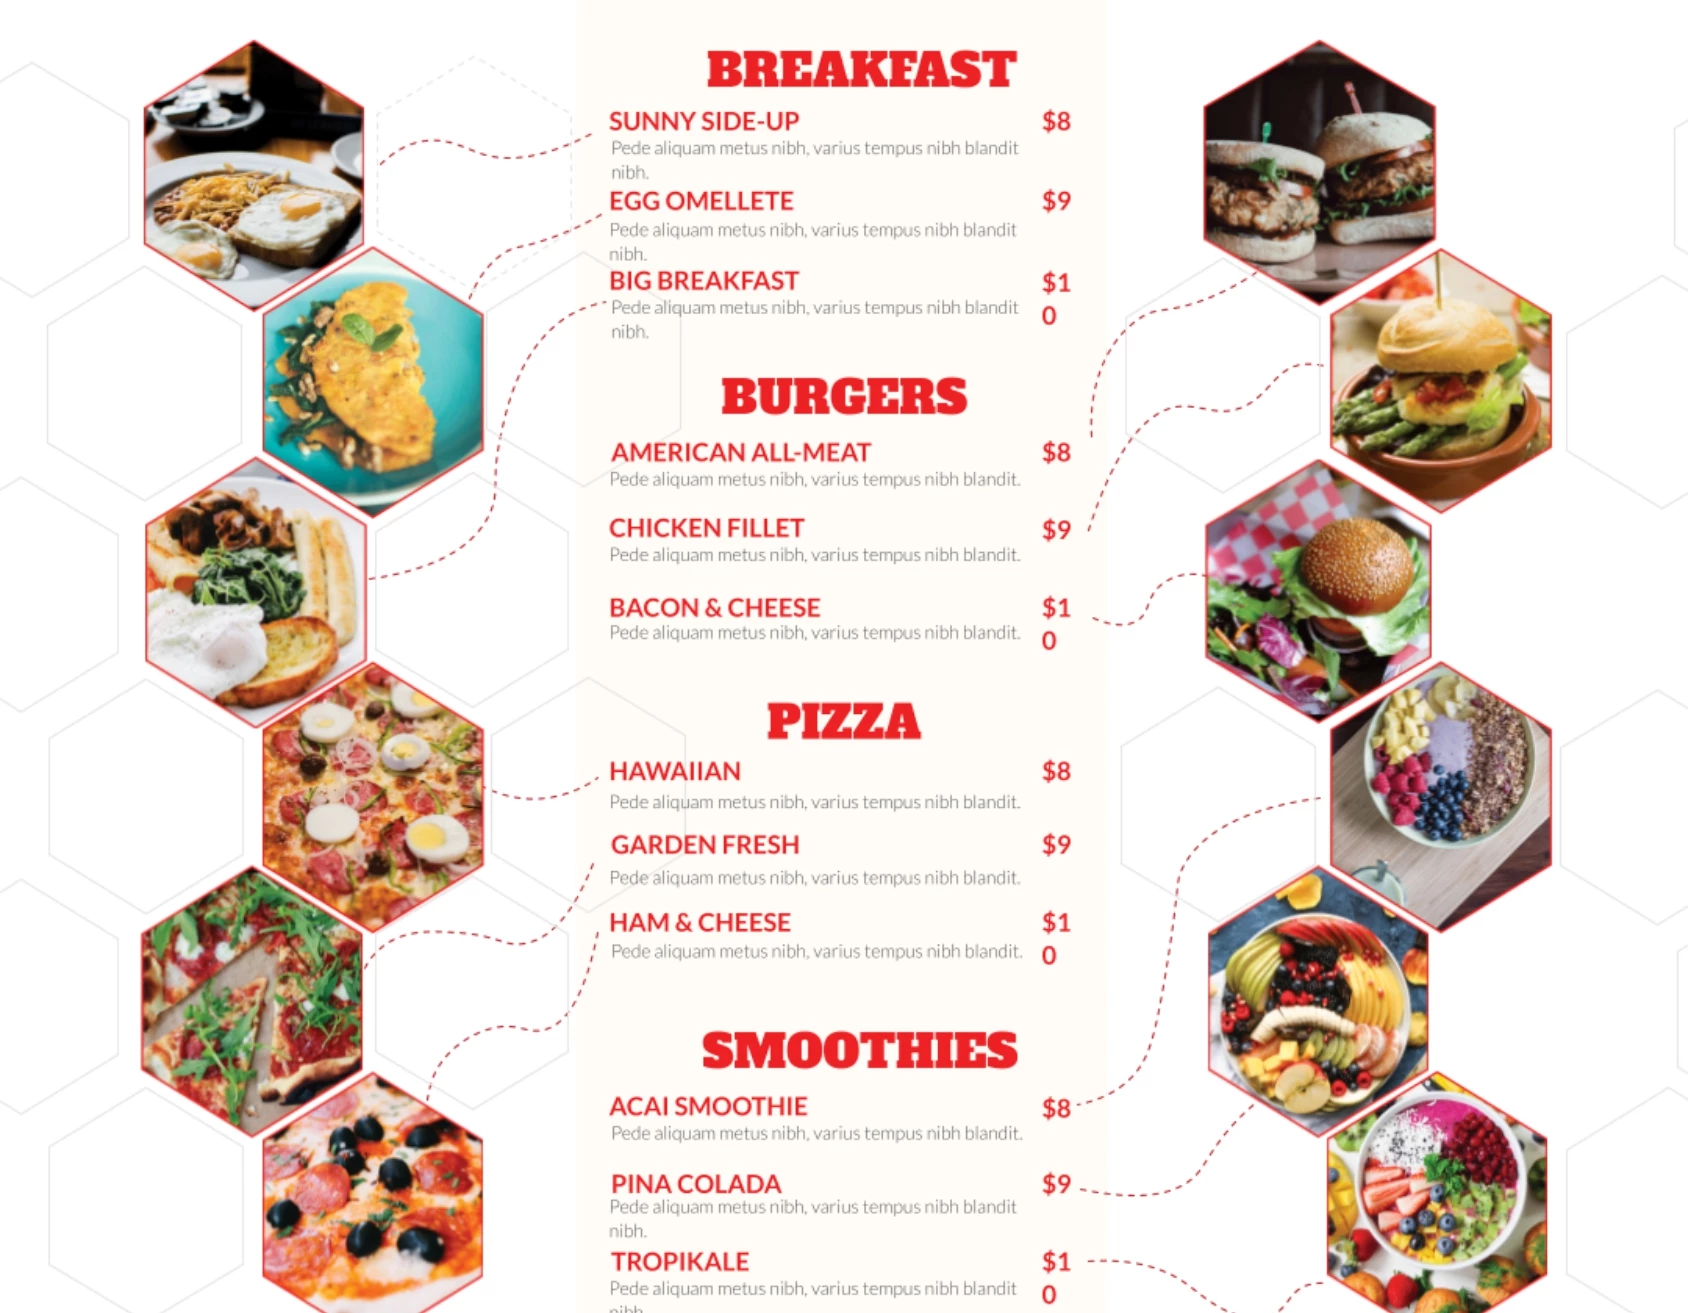
Source: free-psd-templates.com
Elevating your Google Docs menu template from functional to fabulous involves strategically incorporating visual elements. A well-designed menu isn’t just about readability; it’s about creating an appetizing experience for the viewer, whether it’s a restaurant menu or a project Artikel. High-quality visuals significantly impact the overall impression and memorability of your document.Adding images, icons, and custom graphics enhances the visual appeal and helps communicate the menu’s content more effectively.
Careful consideration of color palettes and themes ensures a cohesive and professional look, transforming a simple document into a polished presentation.
Inserting High-Quality Images
To insert high-quality images into your Google Docs menu, begin by ensuring you have access to appropriately sized and high-resolution images. Avoid blurry or pixelated images; these detract from the overall professional look. Once you’ve sourced your images (perhaps from a stock photo website or your own collection), simply click “Insert” > “Image” > “Upload from computer”. Select your image file, and Google Docs will seamlessly integrate it into your document.
You can then resize and reposition the image using the handles that appear around its borders. Remember to maintain a balance; too many images can be overwhelming, while too few might leave the menu feeling bland. Consider using images that directly relate to the menu items or the overall theme. For example, a restaurant menu might use images of the dishes themselves, while a project Artikel could utilize images representing each phase.
Incorporating Icons and Other Graphical Elements
Icons provide a quick and visually appealing way to represent menu items or sections. You can find free icons online from various websites specializing in icon design. Many websites offer both free and paid options, ensuring you find the perfect style to match your menu’s theme. After downloading the icons, you can insert them into your Google Docs menu using the same “Insert” > “Image” > “Upload from computer” method as described above.
Ensure that the icons are appropriately sized and maintain consistency in style and color. Using a consistent icon style throughout the menu contributes to a cohesive design. For example, a minimalist menu might use simple line icons, while a more rustic menu could benefit from hand-drawn or vintage-style icons.
Using Google Docs’ Drawing Tools
Google Docs’ built-in drawing tools offer the flexibility to create custom graphics tailored specifically to your menu. Access the drawing tools by clicking “Insert” > “Drawing”. This opens a drawing canvas where you can create shapes, lines, text boxes, and more. You can use these tools to design custom dividers, borders, or even simple illustrations to represent menu items.
Experiment with different shapes, colors, and line styles to create unique visual elements that enhance the menu’s design. For example, you could create a custom border using a series of connected shapes, or design a simple graphic to represent a specific dish. Remember to keep the graphics simple and consistent with the overall design.
Utilizing Color Palettes and Themes
Choosing a cohesive color palette is crucial for creating a professional and visually appealing menu. Consider the overall theme and tone you want to convey. For example, a restaurant menu with a modern aesthetic might use a palette of cool blues and grays, while a menu for a rustic café might use warm browns and oranges. Many online tools can help you generate color palettes based on specific s or images.
Once you have your color palette, apply it consistently throughout the menu by changing the text color, background color, and the colors used in your graphics.
Example: A modern Italian restaurant menu could use a color palette of deep greens, creamy yellows, and muted browns. The green could be used as an accent color for headings and dividers, the yellow for highlighting key items, and the brown for the background and text. This combination creates a sophisticated and inviting atmosphere.
Using Google Docs for Menu Template Customization and Sharing
Google Docs offers a surprisingly powerful and accessible way to design, customize, and share restaurant menus or any other type of menu. Its collaborative features and diverse export options make it a versatile tool for both individual and team projects. This section will guide you through the process of leveraging Google Docs to its full potential for menu creation and distribution.
Customizing a Pre-made Google Docs Menu Template
Starting with a pre-made template significantly accelerates the design process. Once you’ve found a template you like, customizing it involves several straightforward steps. First, open the template in Google Docs. Then, replace the placeholder text with your actual menu items, descriptions, and prices. You can easily adjust font styles, sizes, and colors to match your brand aesthetic using the formatting toolbar.
Experiment with different text alignments and spacing to create a visually appealing layout. Consider using Google Docs’ built-in table feature to organize your menu items neatly into columns and rows, making it easy to read and navigate. Remember to regularly save your progress to avoid losing any changes.
Collaborating on a Menu Template, Best menu templates google docs
Google Docs shines when it comes to collaboration. To share your menu template for collaborative editing, click the “Share” button in the top right corner. Enter the email addresses of the people you want to collaborate with and choose the appropriate permission level (e.g., “Can edit,” “Can comment”). This allows multiple individuals to work simultaneously on the same document, making it perfect for brainstorming sessions or team-based menu design.
Real-time editing features allow everyone to see changes as they’re made, fostering seamless teamwork. For instance, one person could focus on the food descriptions while another works on the pricing and formatting.
Exporting a Google Docs Menu Template
Once your menu is finalized, exporting it in the desired format is crucial. Google Docs offers several options. To download your menu as a PDF, click “File” then “Download” and select “PDF Document.” This creates a high-quality, print-ready version suitable for professional printing. For online use, you might prefer an image format. Again, go to “File,” then “Download,” but this time choose “JPEG image” or “PNG image.” These formats are ideal for websites or social media posts.
The choice between JPEG and PNG depends on your need for image quality versus file size. PNGs generally provide better quality for text and sharp lines, while JPEGs are often smaller and more suitable for images with smooth color gradients.
Sharing and Distributing the Menu Template
Sharing your finalized menu is simple. For online distribution, you can upload the PDF or image file to your website or share it directly via email. For social media, platforms like Facebook, Instagram, and Twitter readily support image and PDF sharing. Remember to optimize the image size for different platforms to ensure smooth viewing and quick loading times. If you need printed copies, the PDF version is perfect for sending to a professional printer.
Alternatively, you can print the PDF directly from your computer or use a print shop that accepts PDF files. Consider the quantities needed and the overall print quality when choosing a printing method. A high-resolution PDF guarantees a crisp, professional-looking printed menu.
Accessibility Considerations for Google Docs Menu Templates: Best Menu Templates Google Docs
Creating accessible menu templates in Google Docs is crucial for ensuring that everyone, including users with disabilities, can easily understand and interact with your restaurant’s offerings. An accessible menu promotes inclusivity and ensures a positive dining experience for all. Neglecting accessibility can lead to exclusion and potentially lost business.
Color Contrast and Font Size
Sufficient color contrast and appropriate font sizes are fundamental to accessibility. Low contrast between text and background colors can make it difficult for individuals with visual impairments, such as low vision or color blindness, to read the menu. Similarly, small font sizes present a significant barrier. For example, a menu with dark grey text on a light grey background would be difficult to read, whereas a menu with black text on a white background offers optimal contrast.
Using a minimum font size of 14 points ensures readability for most users, and even larger sizes might be beneficial for those with more significant visual impairments. The WCAG (Web Content Accessibility Guidelines) provides specific recommendations for color contrast ratios that should be followed for optimal accessibility.
Alternative Text for Images
Images on your menu, such as photos of dishes, should always include alternative text (alt text). Alt text provides a textual description of the image for screen readers used by visually impaired individuals. Without alt text, screen readers cannot convey the image’s content to the user. For example, instead of simply having an image of a “Lobster Bisque,” the alt text should be descriptive, such as “A rich and creamy lobster bisque, garnished with fresh chives and a swirl of cream.” This ensures that the user understands what the image represents, even without seeing it.
Key Accessibility Features for Google Docs Menu Templates
Designing accessible menus requires careful consideration of several key features. Here are five essential elements to include:
- Sufficient Color Contrast: Use a color contrast checker to ensure that the text and background colors meet WCAG guidelines (e.g., at least 4.5:1 contrast ratio for normal text).
- Appropriate Font Size: Choose a minimum font size of 14 points (or larger for better readability), using a clear and easy-to-read font like Arial or Calibri.
- Alternative Text for Images: Provide detailed and descriptive alt text for all images, explaining the visual content.
- Logical Structure and Headings: Use headings (H1, H2, H3, etc.) to structure the menu logically, making it easier for screen readers to navigate.
- Simple and Clear Language: Avoid jargon or overly complex wording. Keep the language concise and easy to understand.
Final Thoughts
Designing a menu shouldn’t be a headache. With Google Docs’ user-friendly interface and the tips and tricks Artikeld in this guide, you can create beautiful, functional menus that perfectly represent your brand or event. So, ditch the design stress and embrace the simplicity and power of Google Docs. Go forth and create menus that are as memorable as the food itself! Remember to always check for accessibility, making your menu inclusive for everyone.
Happy designing!
Helpful Answers
Can I use Google Docs offline to create my menu?
Yes, as long as you’ve opened the document while online beforehand. Offline access is limited to documents you’ve previously accessed.
What file formats can I export my Google Docs menu as?
You can typically export as PDF, .docx, and image formats (like JPG or PNG). The exact options might depend on your Google Docs version.
Are there any limitations to using Google Docs for complex menu designs?
While Google Docs is versatile, very intricate designs might require more advanced design software. However, for most menus, it offers sufficient capabilities.
How do I ensure my menu is printer-friendly?
Before printing, preview your menu in print layout mode. Adjust margins and font sizes as needed to optimize the appearance on paper.