How to Add Fonts in Photoshop
How to add fonts in Photoshop? That’s a question many designers grapple with, especially when chasing that perfect typographic feel for their projects. This isn’t just about finding the right font; it’s about understanding how to seamlessly integrate them into your workflow, troubleshooting any hiccups along the way, and ultimately mastering the art of typography within Photoshop. We’ll explore everything from the basics of font installation to advanced techniques for creating stunning visual effects.
This guide will walk you through the different methods of adding fonts – system-wide or just for Photoshop – comparing their pros and cons. We’ll delve into troubleshooting common font issues, like corrupted files or rendering problems, and offer practical solutions. Beyond the technical aspects, we’ll also cover best practices for font management, exploring various font types and how to choose the right ones for your projects.
Get ready to elevate your Photoshop game!
Understanding Font Installation in Photoshop: How To Add Fonts In Photoshop

Source: photoshopclippingmask.com
Adding new fonts to Photoshop expands your creative possibilities, allowing you to experiment with different typographic styles and enhance your designs. However, the method you use to install fonts impacts how Photoshop (and other applications) accesses them. Understanding these methods is crucial for a smooth workflow.
There are two primary ways to add fonts to Photoshop: system-wide installation and installation specific to Photoshop. System-wide installation makes the font available to all applications on your computer, while Photoshop-specific installation (which isn’t truly a thing in the way it might seem) only indirectly affects Photoshop’s font access by changing the system fonts.
System-Wide Font Installation
System-wide font installation involves adding the font file to your operating system’s font library. This makes the font accessible to all applications, including Photoshop, without needing any additional configuration within Photoshop itself. This is generally the recommended approach for ease of use and consistent access across all your design software.
The process varies slightly depending on your operating system. Here’s a step-by-step guide for both Windows and macOS:
Windows:
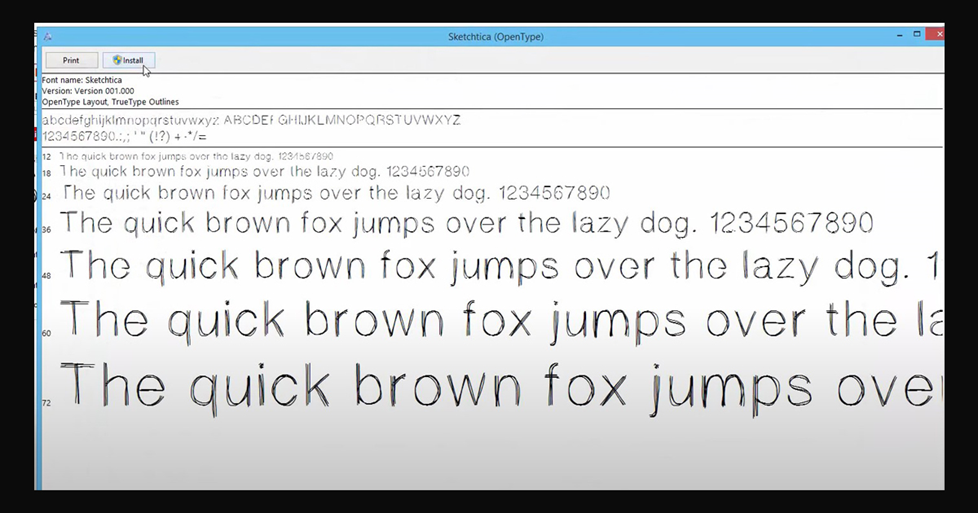
- Locate the font file (usually a .ttf or .otf file). You can usually double-click the file to open it.
- A preview window will open. Click “Install”.
- The font will be added to your system fonts and will be available in Photoshop after a short delay.
macOS:
- Locate the font file (.ttf or .otf).
- Double-click the font file. A preview window will appear.
- Click “Install Font” in the preview window.
- The font will be added to your system fonts and available in Photoshop.
Advantages and Disadvantages of System-Wide Installation
System-wide installation offers several advantages, including simplicity and universal access. However, installing too many fonts can sometimes slow down your system’s performance, especially older machines. It also requires administrative privileges to install.
So you’re wondering how to add fonts in Photoshop? It’s surprisingly easy, just navigate to your system’s font folder and install them. Want to create awesome video tutorials showing off your newfound Photoshop font skills? Check out this great guide on getting it on with YouTube to learn how to make your videos shine. Then, you can return to mastering those Photoshop fonts and creating stunning designs!
| Advantage | Disadvantage |
|---|---|
| Simplicity: Easy to install and manage fonts. | System Performance: Too many fonts can slow down your computer. |
| Universal Access: Fonts are available to all applications. | Administrative Privileges: Requires administrator access to install fonts. |
| Organization: Fonts are centrally managed by the OS. | Potential Conflicts: Rare font conflicts might occur with other programs. |
Photoshop-Specific Font Installation (Indirect Method)
There’s no direct “install font for Photoshop only” option. However, if you install a font only to a specific user profile folder, then only that user profile can access the fonts installed there. This approach is not recommended, however, as it creates unnecessary management complications and is not a robust solution. It’s far better to install system-wide.
Using Installed Fonts in Photoshop
So, you’ve successfully installed your new fonts! Now let’s dive into how to actually use them in Photoshop. Accessing and selecting your newly installed fonts is surprisingly straightforward, and once you know the process, you’ll be able to experiment with different typefaces to create stunning designs.
Photoshop’s font selection is intuitive and integrated directly into the text tools. You’ll find that the newly added fonts seamlessly appear in the font selection menus, ready for your creative projects. Let’s explore how to leverage these new additions to enhance your design work.
Accessing and Selecting Newly Installed Fonts
To use your newly installed fonts, simply open Photoshop and create a new document or open an existing one. Select the Type Tool (usually a capital “T” in the toolbar). Click anywhere on your canvas to create a text box. You’ll then see a dropdown menu labeled “Font” (or similar, depending on your Photoshop version). This menu lists all the fonts currently installed on your system.
Your newly added fonts will appear alphabetically within this list. Select your desired font from the dropdown menu and start typing!
Font Family, Style, and Weight Options
Different fonts offer a variety of styles and weights, allowing for fine-grained control over your typography. Let’s take the example of the font “Roboto”. This widely used font offers a diverse range of options to suit various design needs.
| Font Family | Style | Weight | Example Use Case |
|---|---|---|---|
| Roboto | Regular | Regular | Body text, general purpose |
| Roboto | Italic | Regular | Emphasis, titles |
| Roboto | Regular | Bold | Headings, important information |
| Roboto | Italic | Bold | Strong emphasis, subheadings |
Designing a Sample Photoshop Document
Let’s imagine we’re designing a poster for a hypothetical tech conference. We’ll use a combination of fonts to create visual hierarchy and impact.
For the main title, “Innovate 2024,” we’ll use “Bebas Neue” in a bold, all-caps style at a large size (perhaps 72pt). Bebas Neue’s strong, geometric forms provide a modern and impactful feel, perfectly fitting for a tech conference. The bold weight ensures high readability even from a distance. The all-caps treatment adds to the title’s assertive and prominent character.
The subtitle, “The Future of Technology,” might use “Open Sans” in a lighter weight (Regular) at a smaller size (around 36pt). Open Sans’ clean and legible design complements Bebas Neue while offering a softer contrast. Its readability at a smaller size is ideal for a subtitle. The lighter weight creates a sense of visual balance and avoids overwhelming the main title.
For body text, a sans-serif font like “Lato” in a regular weight (around 12pt) would be suitable. Lato’s clean and modern aesthetics align with the overall theme, while its readability at smaller sizes ensures easy consumption of the event information.
This combination of fonts creates a visually appealing and well-organized poster, using varying weights, styles and sizes to guide the reader’s eye and communicate the information effectively.
Examples of Effective Typography in Photoshop Projects
Effective typography isn’t just about choosing pretty fonts; it’s about using them strategically to enhance the overall message and design. Consider a minimalist website design using a single, clean sans-serif font like “Helvetica Neue” for all elements. The consistency creates a sense of unity and sophistication. Conversely, a vibrant poster advertising a music festival might use a combination of playful script fonts and bold sans-serif fonts to capture the energetic atmosphere.
The contrast in font styles creates visual interest and reflects the event’s spirit.
Think about the context of your design. A corporate brochure will call for different typography choices than a children’s book. The key is to choose fonts that align with the overall message and brand identity, ensuring clarity, readability, and visual appeal.
Troubleshooting Font Issues in Photoshop
So, you’ve added some new fonts to your system, and they’re not showing up in Photoshop, or maybe they’re showing up strangely? Don’t worry, it’s a common problem with a few straightforward solutions. Let’s dive into some troubleshooting steps to get your fonts displaying correctly. This section focuses on identifying common issues and providing solutions to get you back to designing beautifully.
Corrupted Fonts
Sometimes, the font file itself might be corrupted during download or installation. This can lead to Photoshop displaying strange characters, garbled text, or even crashing. To check for corruption, try reinstalling the font from a reliable source. If you downloaded it, try downloading it again from the original website. If you installed it from a CD or other media, try a different installation method or source if available.
A visual cue of corruption might be seeing boxes instead of letters or significantly distorted letterforms. If reinstalling doesn’t work, it’s likely the font file is irreparably damaged and needs to be replaced.
Missing Glyphs
This issue occurs when a font doesn’t contain all the characters you need. For example, a font might be missing certain symbols, accented characters, or even entire alphabets depending on its design. This usually isn’t a problem with the Photoshop installation, but rather a limitation of the font itself. The solution is simple: find a different font that includes the glyphs you need.
Many free and commercial font sites provide previews, allowing you to verify glyph availability before downloading. You might see empty boxes or placeholders where specific characters should be.
Font Rendering Problems
Poor font rendering in Photoshop can manifest as blurry, jagged, or pixelated text. This can be due to several factors, including your display settings, Photoshop’s rendering engine, or even your graphics card drivers. First, ensure your display settings are optimized for high resolution. Secondly, check Photoshop’s preferences for any font-related settings that might need adjustment. Finally, updating your graphics card drivers can often resolve rendering issues, as outdated drivers can sometimes cause compatibility problems.
You might see noticeable fuzziness or distortion around the edges of the letters, making them appear less crisp.
Font Conflicts
Having multiple fonts with similar names (e.g., “Arial” and “Arial Bold Italic”) can sometimes cause conflicts, leading to unexpected font substitutions or Photoshop choosing the wrong font. The best solution is to carefully review your installed fonts and remove any duplicates or unnecessary variations. Photoshop’s font list might show multiple versions of the same font family, leading to confusion and incorrect font selection within your projects.
A thorough review and removal of redundant font files can prevent this issue.
Font Management Best Practices
Efficient font management is crucial for a smooth Photoshop workflow and high-quality design output. A well-organized font library prevents conflicts, improves performance, and ultimately saves you time and frustration. This section Artikels best practices for managing your fonts both within Photoshop and your operating system.
Proper font management involves a multi-pronged approach, encompassing organization, optimization, and preventative measures like backups. Ignoring these best practices can lead to slowdowns, crashes, and even the loss of valuable font assets. Let’s delve into the key elements.
Font Organization Strategies
Keeping your fonts organized is paramount. A chaotic font library makes finding the right font a tedious task and increases the risk of accidental duplication or deletion. Consider these strategies:
- Create a dedicated font folder: Store all your fonts in a single, easily accessible location on your hard drive. This could be a folder named “Fonts” on your Desktop or within your Documents folder. Avoid placing fonts directly in the system font folder unless absolutely necessary.
- Organize by category: Within your main font folder, create subfolders to categorize your fonts. Possible categories include “Serifs,” “Sans-Serifs,” “Scripts,” “Display,” or by project (e.g., “Client A,” “Website Redesign”).
- Use descriptive filenames: Rename your font files with clear and consistent naming conventions. For example, instead of “font123.ttf,” use “TimesNewRoman-Regular.ttf”.
Optimizing Font Performance in Photoshop
Photoshop’s performance can be significantly impacted by the number of fonts installed. Too many fonts can slow down the application’s startup time and font selection process. Here’s how to optimize:
- Deactivate unused fonts: Regularly review your installed fonts and deactivate those you rarely or never use. Many operating systems allow you to deactivate fonts without uninstalling them, keeping them available if needed later.
- Use font management software: Consider using a dedicated font management application. These applications allow you to activate and deactivate fonts selectively, often providing features like font preview and search functionalities, significantly improving your workflow.
- Restart Photoshop: After adding or removing fonts, always restart Photoshop to ensure the changes take effect. This helps prevent unexpected font-related issues.
The Importance of High-Quality Fonts
Using high-quality fonts is crucial for professional design projects. Low-quality fonts can significantly detract from the overall aesthetic and professionalism of your work. High-quality fonts typically possess superior kerning, hinting, and overall readability, resulting in cleaner and more polished designs.
- Invest in commercial fonts: Commercial fonts often offer better design consistency and support, including technical support and updates.
- Research font licenses: Always respect font licenses. Using fonts without proper licensing can have legal and ethical implications.
- Consider font pairings: Carefully choose fonts that complement each other in terms of style and readability. Inconsistent font pairings can create visual dissonance and reduce the impact of your design.
Font Backup Strategies
Losing your font collection can be a devastating event, especially if you rely on them for professional work. Regular backups are essential to mitigate this risk.
- Regularly back up your font folder: Create regular backups of your entire font folder to an external hard drive, cloud storage service, or other secure location. Consider scheduling automatic backups using your operating system’s built-in tools or a third-party backup application.
- Version control: If you frequently modify or create custom fonts, consider using a version control system to track changes and easily revert to previous versions if necessary.
- Keep backups in multiple locations: For ultimate safety, store backups in multiple locations, ideally both on-site and off-site, to protect against data loss from theft, fire, or other unforeseen events.
Exploring Different Font Types in Photoshop
Choosing the right font is crucial for effective visual communication in Photoshop. The impact of typography on a design’s overall aesthetic and readability cannot be overstated. Understanding the characteristics of different font types allows designers to make informed choices that enhance their projects.
Different font types possess unique visual qualities that lend themselves to specific design applications. Knowing which font type to use for various projects is a skill honed through practice and understanding their inherent characteristics.
Serif Fonts
Serif fonts are characterized by small decorative strokes, or “serifs,” at the ends of their letterforms. These subtle details add a classic and often more formal feel. They are highly legible, especially in larger sizes, making them ideal for body text in print media or situations requiring extended reading. Examples include Times New Roman, Garamond, and Georgia. In Photoshop, serif fonts work well for long-form content within a design, such as website copy or lengthy captions accompanying images.
Their timeless elegance makes them suitable for branding projects aiming for a sophisticated and traditional aesthetic.
Sans-serif Fonts
Sans-serif fonts lack the decorative serifs found in their serif counterparts. This clean, minimalist aesthetic makes them versatile and modern. Sans-serif fonts are generally considered more contemporary and are often preferred for on-screen readability due to their simplicity. Popular examples include Arial, Helvetica, and Open Sans. In Photoshop, sans-serif fonts are excellent for headlines, short text blocks, and user interface elements.
Their clean lines and straightforward nature make them ideal for contemporary designs, digital marketing materials, and applications where clarity and efficiency are paramount.
Script Fonts
Script fonts mimic handwriting styles, often featuring flowing, connected letters. They are highly expressive and visually appealing but should be used sparingly, as excessive use can hinder readability. Examples include Edwardian Script ITC and Lucida Handwriting. In Photoshop, script fonts are best suited for adding a personal touch, such as in wedding invitations, logos, or short decorative text elements.
Their elegant, cursive style can convey a sense of personality and sophistication, but overuse can make a design appear cluttered or difficult to read.
Display Fonts
Display fonts are designed to make a statement. They are often highly stylized, unique, and unconventional, sacrificing readability for visual impact. They’re not suitable for large amounts of text. Examples include Impact, Blackoak, and Bebas Neue. In Photoshop, display fonts excel as headlines, logos, or short, impactful text elements.
Their bold and attention-grabbing nature makes them ideal for grabbing the viewer’s attention in posters, advertisements, and branding materials where a strong visual presence is desired.
Font Type Comparison, How to add fonts in photoshop
The following table provides a visual comparison of the four font types discussed:
| Font Type | Characteristics | Photoshop Applications | Example |
|---|---|---|---|
| Serif | Small decorative strokes at the ends of letterforms; classic, formal feel; highly legible | Body text, print media, sophisticated branding | Times New Roman |
| Sans-serif | Clean, minimalist; modern; good on-screen readability | Headlines, short text, UI elements, contemporary designs | Arial |
| Script | Mimics handwriting; flowing, connected letters; expressive but can be less legible | Wedding invitations, logos, decorative text | Edwardian Script ITC |
| Display | Highly stylized; unconventional; strong visual impact; not suitable for large amounts of text | Headlines, logos, short impactful text | Impact |
Selecting Appropriate Fonts Based on Project Purpose and Target Audience
Font selection significantly impacts the success of a design project. Consider the project’s purpose and the target audience when choosing fonts. For instance, a children’s book might utilize playful, rounded sans-serif fonts, while a legal document would benefit from a legible serif font. Understanding the connotations associated with different font types—such as the formality of serifs or the modernity of sans-serifs—is essential for aligning the design’s aesthetic with its intended message and audience.
A youthful audience might respond better to modern sans-serif fonts, while an older demographic might prefer the classic feel of a serif font. Careful consideration of these factors ensures the design is both aesthetically pleasing and effectively communicates its message.
Advanced Font Techniques in Photoshop
Photoshop’s text capabilities extend far beyond simple type placement. Mastering advanced techniques unlocks a world of creative possibilities, allowing you to craft unique typographic styles and elevate your designs to a professional level. This section delves into creating custom styles, utilizing OpenType features, and even transforming images into fonts.
Creating Custom Font Styles with Text Effects
Photoshop offers a robust suite of text effects to create unique and customized font styles. These effects go beyond simple bolding or italicizing, allowing for the application of bevels, embossing, strokes, gradients, and more. For example, you can create a distressed, vintage-style font by applying a layer style with an inner shadow, texture overlay, and a subtle bevel and emboss.
Experimenting with different layer style combinations opens the door to countless variations. To apply these effects, simply select your text layer, double-click it to open the Layer Style dialog box, and explore the various options. Remember to save your stylized text as a custom shape or brush for reuse across projects. This significantly streamlines your workflow and ensures consistency in your designs.
Utilizing OpenType Features
Many modern fonts, particularly those classified as OpenType fonts, offer a wealth of hidden features accessible within Photoshop. These include ligatures (where two or more characters combine to form a single glyph, like ‘fi’ or ‘fl’), stylistic alternates (providing variations of individual characters), and contextual alternates (where the appearance of a character changes based on its surrounding characters). To access these features, look for the “Character” panel in the Properties panel (Window > Character).
You’ll often find controls for activating these features directly within the panel, usually represented by small icons or drop-down menus. Using these OpenType features adds sophistication and visual interest to your typography, lending a professional touch to your designs. For example, using ligatures can create a more elegant and refined look, especially in body text.
Converting Images into Fonts
While not a direct function within Photoshop itself, you can convert images into fonts using third-party software. This process involves tracing the image to create vector Artikels for each character, then importing those Artikels into font creation software like FontForge or Glyphs. This technique is useful for creating custom fonts based on hand-drawn lettering, logos, or other unique imagery.
The resulting font can then be used within Photoshop, offering a truly personalized and branded look to your projects. The complexity of this process depends on the image’s intricacy and the desired level of detail in the final font. Simple, clean images are easier to convert than complex, highly detailed ones.
Advanced Tips for Professional Typography
Achieving professional-looking typography in Photoshop requires attention to detail and a solid understanding of typographic principles. Consider using kerning (adjusting the space between individual characters) and tracking (adjusting the overall spacing of a block of text) to optimize readability and visual appeal. Pay close attention to line height (leading) and paragraph spacing to ensure comfortable reading. Furthermore, selecting appropriate font pairings is crucial.
Consider using a serif font for body text and a sans-serif font for headings to create visual hierarchy and contrast. Mastering these elements will significantly enhance the overall quality and impact of your Photoshop designs. Remember that less is often more; avoid overcrowding your designs with too many fonts or overly stylized text. Simplicity and clarity are key to effective typography.
Final Review
Mastering fonts in Photoshop is a journey, not a destination. From understanding the nuances of different font types to troubleshooting pesky issues, this guide has equipped you with the knowledge and skills to confidently navigate the world of typography. Remember to always back up your fonts, experiment with different styles, and let your creativity shine through your carefully chosen typefaces.
Happy designing!
Query Resolution
What if my Photoshop doesn’t recognize a newly installed font?
Try restarting Photoshop. If the problem persists, check if the font is correctly installed on your system. Sometimes, a system-wide font refresh might be needed.
How do I know if a font is high-quality?
Look for fonts from reputable foundries. High-quality fonts usually have smooth curves, consistent kerning, and a wide range of weights and styles.
Can I use fonts from my computer without installing them?
No, Photoshop needs to have access to the font files to be able to use them. You must install the fonts to your operating system.
What should I do if I have multiple fonts with the same name?
This can cause conflicts. Try renaming one of the fonts to avoid confusion. You might also want to uninstall duplicate fonts to prevent issues.


