How to Install Fonts on Android
How to install fonts on Android? It’s a question many Android users ask, especially those who crave customization and want to personalize their phone’s look and feel. This isn’t always straightforward, as Android’s font system can be a bit mysterious. We’ll explore the different ways you can add new fonts to your Android device, from using dedicated apps to more advanced techniques like sideloading.
Get ready to unleash your inner typographer!
We’ll cover everything from understanding the different types of Android fonts and supported file formats (like TTF and OTF) to troubleshooting common installation problems. Whether you’re a tech novice or a seasoned Android user, this guide will empower you to easily change up your phone’s fonts and make it truly your own. We’ll delve into the pros and cons of various methods, including using popular apps and even the more advanced (but potentially risky) method of manual sideloading.
Let’s dive in!
Understanding Android Font Systems

Source: amazonaws.com
Android’s font handling is a bit more complex than simply installing a file. It involves a nuanced interplay between system-wide fonts and those used specifically by individual apps. Understanding this distinction is key to successfully customizing your device’s typography.Android manages fonts in two primary ways: system fonts and app-specific fonts. System fonts are applied globally, affecting the appearance of most system UI elements, such as menus, settings, and notifications.
App-specific fonts, on the other hand, are embedded within individual applications and are only used by those apps. This means changing a system font will alter the look of the entire operating system, while changing an app’s font typically requires the app itself to support custom font selection.
Android Font File Formats
Android primarily supports two major font file formats: TrueType Fonts (TTF) and OpenType Fonts (OTF). Both formats are capable of storing a wide range of typographic information, including glyphs (characters), kerning (spacing between letter pairs), and hinting (instructions for rendering fonts at different sizes). While both are widely compatible, OTF often offers better support for advanced typographic features, such as ligatures (combined characters like “fi” or “fl”) and OpenType features that enable stylistic variations.
Generally, you’ll find both TTF and OTF files work seamlessly on most modern Android versions.
Font Installation Methods: A Comparison
The method you choose to install fonts significantly impacts ease of use, system-wide impact, and compatibility. Here’s a comparison:
| Method | Advantages | Disadvantages | Compatibility |
|---|---|---|---|
| Using a dedicated font installer app (e.g., iFont) | User-friendly interface, often supports a wide range of font formats, may offer preview functionality. | Requires installing a third-party app, potentially introduces security risks if the app is not from a reputable source, may require root access on some devices. | Generally good across many Android versions, but specific app compatibility varies. |
| Manually copying font files to the system directory | No need for additional apps, gives more control. | Requires technical knowledge, can be risky if done incorrectly, may require root access, may not work consistently across different Android versions or devices. | Highly variable depending on Android version and device manufacturer. |
| Using a custom ROM or launcher | Potentially allows for more extensive font customization, often includes system-wide changes. | Requires flashing a custom ROM or installing a custom launcher which can be complex and may void warranties, carries a higher risk of bricking your device if not done correctly. | Highly variable, dependent on the specific ROM or launcher. |
| App-specific font selection (if supported by the app) | Only affects the chosen app, generally safe and simple. | Limited to apps that explicitly support custom font selection, doesn’t provide system-wide changes. | Excellent within compatible apps; no impact on system or other apps. |
Installing Fonts Using Supported Apps
Many Android devices don’t offer built-in font installation options, unlike desktop operating systems. However, several third-party apps provide this functionality, allowing you to customize your phone’s look and feel. These apps typically require specific permissions to access system files and modify the device’s appearance. Let’s explore some popular choices and how to use them.
While various apps claim to offer font installation, not all are equally reliable or user-friendly. It’s crucial to choose reputable apps from trusted sources like the Google Play Store to avoid malware or performance issues. Always check user reviews and ratings before installing any font app.
Popular Font Installation Apps and Their Functionality
Several apps provide font installation capabilities, each with its own strengths and weaknesses. iFont is a well-known example, offering a vast library of fonts and a relatively straightforward installation process. Other apps may specialize in specific font styles or offer additional customization options beyond just font changes. Choosing the right app depends on your personal preferences and needs.
For this tutorial, we will focus on two popular choices: iFont and Font Changer.
Before proceeding, remember that the specific steps and app interfaces may vary slightly depending on the Android version and the app itself. The screenshots provided are illustrative examples and may differ from the actual app interface.
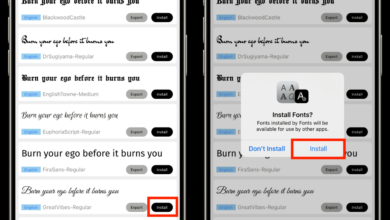
Installing Fonts Using iFont
iFont is a popular choice for its extensive font library and user-friendly interface. The following steps illustrate the typical process of installing a font using this app. Remember to always download fonts from trusted sources to avoid security risks.
- Download and install iFont from the Google Play Store.
- Open the iFont app. You’ll likely see a selection of featured or categorized fonts.
- Browse the available fonts and select one you wish to install. Tap on the font’s thumbnail for a preview.
- Once you’ve chosen a font, tap the “Download” or equivalent button. The app will download the font file.
- After the download completes, tap the “Set” or “Apply” button. The app will prompt you to select a font style (Regular, Bold, Italic, etc.).
- The app may request permission to access system settings. Grant this permission to allow the font to be applied system-wide.
- Reboot your device (sometimes required for the changes to take full effect).
Installing Fonts Using Font Changer
Font Changer, another popular app, offers a slightly different approach to font installation. The steps may vary slightly compared to iFont.
- Download and install Font Changer from the Google Play Store.
- Launch the Font Changer app. You’ll likely be presented with a list of available fonts, either pre-installed or downloadable.
- Select the font you want to install. Many apps provide previews to help you choose.
- Tap the “Download” button to download the selected font.
- Once downloaded, tap the “Apply” button. The app may require system-level permissions to modify fonts.
- You may need to reboot your device to see the changes applied.
Permissions Required by Font Installation Apps
Font installation apps require certain permissions to function correctly. These permissions typically include access to system settings and storage. The “System Settings” permission allows the app to modify system-wide font settings, applying the selected font to various apps and system interfaces. The “Storage” permission allows the app to download and save font files to your device. Granting these permissions is essential for the app to work as intended.
Without these permissions, the app will not be able to install or apply the new font.
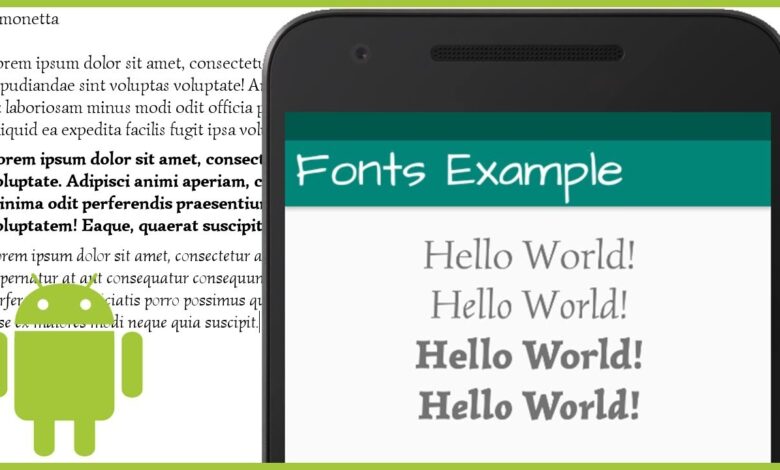
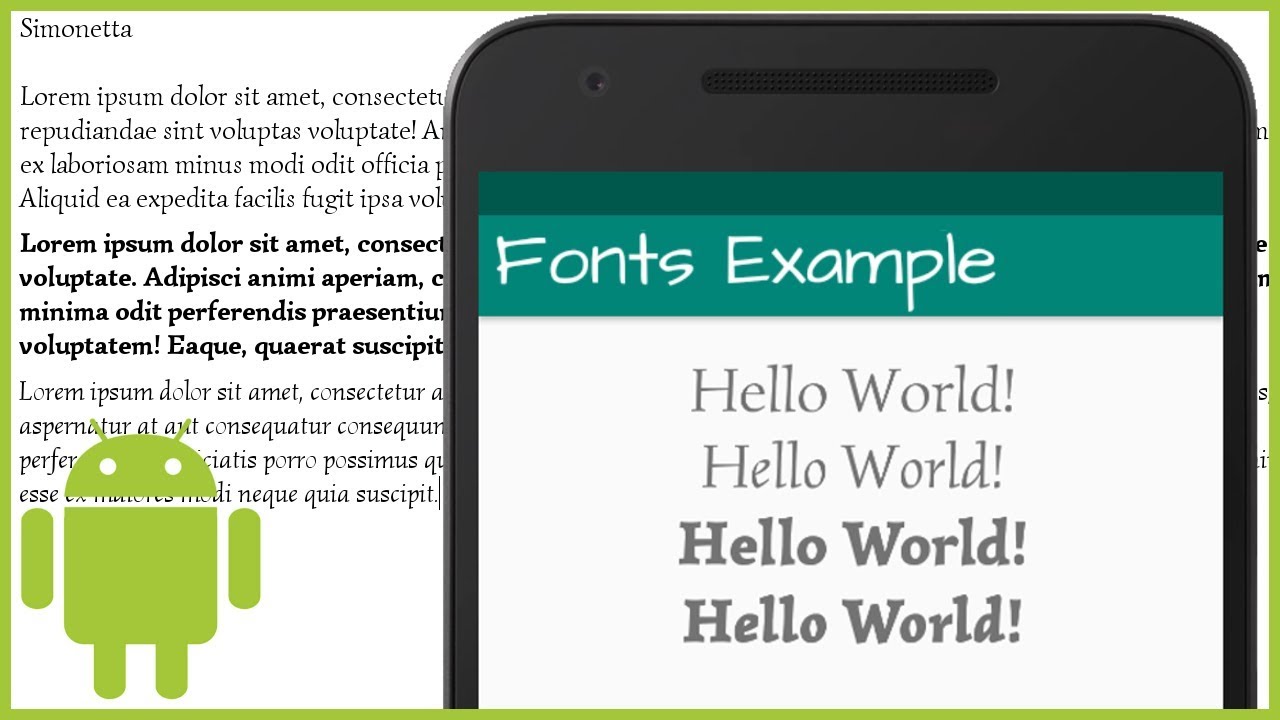
Applying Newly Installed Fonts Within Different Apps
Once a new font is installed, it should automatically be applied system-wide. However, some apps may not immediately reflect the changes. In most cases, simply closing and reopening the app should suffice. If the new font isn’t visible, try restarting your device. If the problem persists, check the app’s settings for font customization options; some apps offer individual font selection overrides.
Installing Fonts via System Settings (if applicable)
Direct font installation through Android’s system settings isn’t a universally available feature. Its presence and functionality depend heavily on the specific Android version, device manufacturer, and even the device model itself. While some older versions of Android offered this functionality, it’s largely been replaced by app-based methods in more recent releases. This section details the process where it
is* available, along with its limitations.
The ability to install fonts directly through system settings was more common in older Android versions (pre-Android 10, generally). Even then, it wasn’t a consistent feature across all devices. Manufacturers often customized the Android experience, sometimes removing or altering this functionality. Therefore, success with this method isn’t guaranteed.
Android Versions Supporting Direct Font Installation via System Settings
Pinpointing the exact Android versions that consistently support this feature is difficult due to the manufacturer variations mentioned above. However, some users reported success with this method on Android versions prior to Android 10 (API level 29). Keep in mind that this is not a guarantee; your mileage may vary based on your device and its software.
Steps for Installing Fonts via System Settings (if applicable)
The exact steps may vary slightly depending on your Android version and device manufacturer. However, the general process is similar. This method typically involves navigating to display settings and then selecting a font option. This section Artikels a generalized approach; your device’s specific steps might differ.
- Go to your device’s Settings app.
- Navigate to Display or a similarly named section. This might be labeled Display settings, Screen, or something similar.
- Look for an option related to Fonts, Font style, or Display font. This option might be nested within other menus.
- If available, you’ll likely see a list of pre-installed fonts. There should be an option to add or download new fonts. This might be a button, a menu option, or a gesture (like tapping a plus icon).
- Select the option to add a font. You’ll then need to locate the font file (.ttf or .otf) on your device’s storage (usually your internal storage or an SD card).
- Select the font file and confirm the installation. The system will then install and apply the font system-wide.
Limitations and Restrictions of Direct Font Installation
Even when this method is available, it usually has significant limitations. These limitations often include:
- Limited Font Support: The system may only support specific font formats (like .ttf and .otf) and may reject others.
- Restricted Font Selection: The number of fonts that can be installed directly through system settings is often limited, and the selection might be curated by the manufacturer.
- No System-Wide Application Guarantee: Even if a font installs, it might not be applied to all apps, only system-level elements.
- Lack of Font Management Tools: You usually won’t have granular control over font management features like previewing or uninstalling individual fonts.
Potential Error Messages and Solutions
Encountering errors during direct font installation is common. Here are a few examples and potential solutions:
- “Unsupported File Format”: The system doesn’t recognize the font file type. Ensure you’re using a .ttf or .otf file. Some less common formats may not be supported.
- “Insufficient Storage Space”: Your device lacks the necessary space to install the font. Free up space by deleting unnecessary files or apps.
- “Font Installation Failed”: This is a general error. Try restarting your device, ensuring the font file is not corrupted, and checking for system updates.
- “Font Not Applied”: The font installed but isn’t showing. Try restarting your device or checking the app’s settings to see if you need to manually select the font.
Sideloading Fonts (Advanced Method)
Source: ytimg.com
Sideloading fonts is a more advanced technique that allows you to install fonts not available through standard app stores or system settings. It involves manually placing font files into specific system directories. While offering greater control, it also carries a higher risk of damaging your system if done incorrectly. Proceed with caution and only attempt this if you’re comfortable working with your Android’s file system.This method requires root access, and it is highly recommended to back up your data before attempting to sideload fonts.
Incorrectly placed font files can cause system instability or even boot loops. Always download fonts from trusted sources to avoid malware or corrupted files.
Font File Placement
Manually installing fonts requires placing the font files (.ttf or .otf) into the appropriate system directories. The exact location may vary slightly depending on your Android version and device manufacturer, but the general structure remains similar. The system will usually scan these directories for new fonts upon reboot. To find the correct locations, you will need a file manager app with root access.
System Font Directory Structure
Imagine a file system represented as a tree. The root of the tree is the top-level directory of your Android device’s internal storage. From there, you’ll navigate down branches. The exact paths can vary, but generally, you might find system fonts under a path similar to this:`/system/fonts/`Within this `/system/fonts/` directory, you might find subdirectories for different font styles or weights (e.g., `/system/fonts/roboto/`, `/system/fonts/noto/`).
You’ll want to place your font files within an appropriate subdirectory, or create a new one if necessary. For example, if you have a font file named “MyCustomFont.ttf”, you might place it in `/system/fonts/custom/`. This helps to organize your custom fonts and prevents conflicts with existing system fonts.
Precautions for Sideloading
Before attempting to sideload fonts, remember these critical precautions:* Backup your data: Before making any changes to your system files, always create a full backup of your device. This allows you to restore your system if something goes wrong.
Use a reliable file manager
Employ a file manager app with root access capabilities. Ensure the app is reputable and from a trusted source.
Download fonts from trusted sources
Only download fonts from known and reputable websites to avoid introducing malware or corrupted files.
Verify file integrity
After downloading, check the integrity of the font files using a checksum tool to ensure they haven’t been tampered with.
Rename carefully
Use descriptive and unique names for your font files to avoid conflicts or overwriting existing system fonts.
Reboot your device
After placing the font files, reboot your device for the changes to take effect. If the fonts don’t appear, try clearing the cache of the apps that use fonts.
Monitor for issues
After rebooting, observe your device for any unusual behavior or errors. If problems occur, you might need to restore your system from backup.
Troubleshooting Font Installation Issues
Installing new fonts on Android can sometimes present challenges. While the process is generally straightforward, various factors can lead to installation failures or unexpected display issues. This section covers common problems and their solutions, empowering you to troubleshoot and resolve font installation problems effectively. Understanding the potential issues and their solutions will save you time and frustration.
Font Rendering Issues
Blurry or incorrectly displayed fonts are among the most common complaints. This often stems from incompatibility between the font file and the Android system, or from insufficient system resources. The problem might also be caused by a corrupted font file itself. If a font appears blurry, try restarting your device. This simple step often clears temporary system caches and can resolve minor rendering problems.
If the issue persists, try installing the font through a different app, as some apps handle font rendering differently. Finally, consider that some fonts, particularly those with complex glyphs, may not render perfectly on all devices due to limitations in hardware or software.
Failed Font Installation
A font might fail to install for several reasons. The most frequent cause is an incorrect file format. Android typically supports .ttf and .otf font files. Attempting to install a font in a different format (like .woff) will likely result in failure. Another common reason is insufficient storage space on your device.
Ensure you have ample free space before attempting to install any new fonts. Permissions issues can also prevent installation. Some apps require specific permissions to access and modify system files. Make sure the app you’re using has the necessary permissions enabled in your device’s settings. Finally, a corrupted font file itself can prevent installation.
Download the font again from a reliable source to rule out file corruption.
Diagnosing Installation Problems Using System Logs (Advanced), How to install fonts on android
For advanced troubleshooting, examining system logs can provide valuable insights into installation failures. Accessing system logs varies depending on your Android device and its version, and usually requires enabling developer options. Generally, you can find log information within Android’s developer options menu, often accessed through multiple taps on the “Build Number” in the “About Phone” section of your settings.
The log files contain detailed information about system events, including font installation attempts. Searching within the logs for s related to the font file name or the font installation app can help identify the root cause of the problem. Interpreting these logs requires some technical expertise, but if you are comfortable with command-line interfaces or log file analysis, this method can be very helpful.
Note that log file entries can be quite technical and require some familiarity with system error codes to interpret.
Font Management and Removal: How To Install Fonts On Android
Keeping your Android device’s fonts organized and optimized is crucial for both performance and aesthetics. Too many fonts can bloat storage and slow down your phone, while a poorly managed font collection can make finding the right font for a task frustrating. This section will guide you through the process of managing and removing fonts on your Android device, ensuring a smooth and efficient experience.
Managing your fonts involves several key steps: viewing what you have installed, selecting which fonts are active for different apps, and finally, safely removing those you no longer need. Remember, removing system fonts can lead to instability, so always focus on user-installed fonts first.
So you’re wondering how to install fonts on Android? It’s actually pretty straightforward, but sometimes you need a visual guide. If you’re more of a video learner, check out this awesome tutorial on getting it on with youtube for a similar process, and then you can easily apply those steps to installing fonts on your Android device.
After watching, you’ll be a font-installing pro in no time!
Viewing Installed Fonts
Many Android devices don’t offer a centralized font management tool. If your device uses a custom launcher or has a built-in font management feature (like some Samsung devices), you might find a dedicated section in the settings menu. Look for options related to “Display,” “Fonts,” or “Themes.” This section will usually list all the currently installed fonts, sometimes showing a preview.
If your device doesn’t have this feature, you’ll need to rely on the app you used to install the fonts, which may have its own font management section. Otherwise, identifying individual fonts requires checking the apps that utilize them.
Selecting Active Fonts
The ability to select which fonts are active for specific apps is highly dependent on the apps themselves and your device’s capabilities. Some apps, particularly those for document editing or note-taking, allow you to choose the font directly within the app’s settings. Others might inherit the system-wide font setting. There isn’t a universal method for selecting active fonts across all apps.
Deleting Fonts Safely
Removing fonts should be done carefully. Always begin by uninstalling fonts through the app you initially used to install them. Many font management apps provide a clear uninstall or delete option. If you sideloaded fonts, deleting the font files directly from your device’s storage is necessary; however, it is crucial to identify the correct files to avoid accidentally deleting important system files.
Before deleting any font files, back up your device, just in case. After deleting, reboot your device to ensure the changes take effect.
Optimizing Font Storage
To optimize font storage and prevent performance issues, regularly review your installed fonts. Delete those you rarely use or no longer need. Consider using font management apps that offer features like font previews and usage statistics to help you identify which fonts are underutilized. Avoid installing excessively large or numerous font families unless absolutely necessary.
Font Management Techniques
The following table summarizes different font management techniques and their effectiveness. The effectiveness is subjective and depends on your device and the apps you use.
| Technique | Description | Advantages | Disadvantages |
|---|---|---|---|
| Using a Font Management App | Employing a dedicated app to install, manage, and remove fonts. | Centralized management, often with preview and uninstall features. | Relies on third-party app; app functionality may vary. |
| Using System Settings (if available) | Managing fonts directly through the device’s system settings. | Simple, built-in solution; no extra apps needed. | Limited availability; features may be basic. |
| Manual Sideloading and Deletion | Installing and deleting fonts by manually copying and removing files. | Provides maximum control; works when other methods fail. | Risk of accidentally deleting system files; requires technical knowledge. |
| Regularly Reviewing App Font Settings | Checking individual apps for font selection and removal options. | Direct control over app-specific fonts. | Tedious process; no centralized overview. |
End of Discussion
So, there you have it! From simple app installations to the more technical sideloading, you now possess the knowledge to conquer Android font installation. Remember to always back up your data before attempting advanced methods, and choose the approach that best suits your comfort level. Experiment with different fonts, personalize your phone’s appearance, and enjoy the unique visual experience you’ve created! Happy font hunting!
Questions and Answers
Can I install fonts on all Android versions?
The ease of installation varies. Older Android versions might require more advanced methods, while newer ones might offer simpler built-in options.
What if a font doesn’t show up after installation?
Restart your phone. If the problem persists, check app permissions and ensure the font file is correctly placed (if using sideloading). Sometimes, the app you’re trying to use the font in may not support it.
Are there any risks associated with installing fonts?
Generally, using reputable apps is safe. However, manually sideloading fonts carries a slight risk of system instability if done incorrectly. Always back up your data before attempting this method.
How many fonts can I install?
The number of fonts you can install depends on your device’s storage space and the capabilities of the apps you’re using. There’s no fixed limit, but installing too many might impact performance.