
How to Upload Fonts to Cricut Design Space
How to upload fonts to Cricut Design Space? It’s a question many crafters ask, especially when they discover the limitations of the pre-loaded fonts. This isn’t just about adding variety; it’s about unlocking the potential for truly unique and personalized projects. From finding the perfect font to troubleshooting pesky upload issues, we’ll cover everything you need to know to expand your Cricut font library and unleash your creativity.
Get ready to dive in and discover a world of typographic possibilities!
This guide will walk you through the entire process, from understanding Cricut Design Space’s font compatibility to mastering advanced techniques for combining fonts in your designs. We’ll tackle common problems, share tips for efficient font management, and even point you towards amazing resources for finding new fonts to add to your collection. By the end, you’ll be a font-uploading pro, ready to create stunning Cricut projects that truly reflect your personal style.
Understanding Cricut Design Space Font Limitations
So you’ve got your Cricut machine ready to go, and you’re itching to create some amazing projects. But before you dive into designing, it’s crucial to understand the nuances of fonts within Cricut Design Space (CDS). Not all fonts are created equal when it comes to cutting and weeding, and knowing what works best will save you time and frustration.
This guide will walk you through the key limitations and considerations.
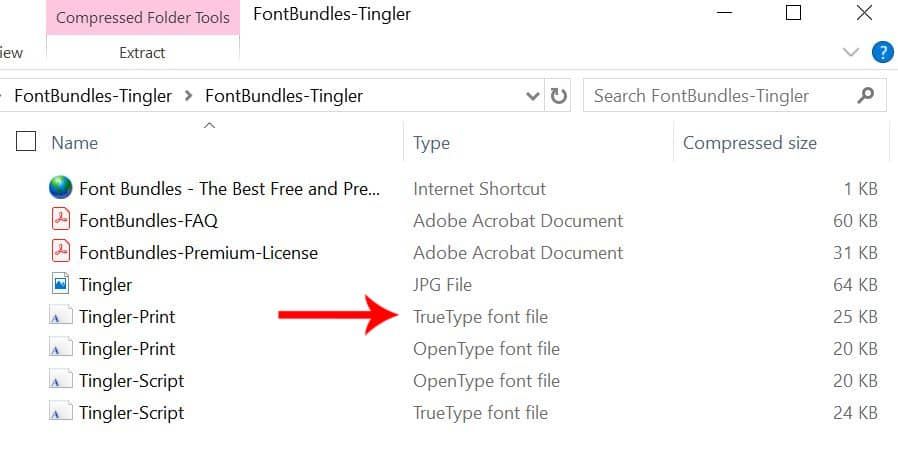
Cricut Design Space primarily supports TrueType (.ttf) and OpenType (.otf) font files. These are the standard font formats used across most operating systems. However, simply having a .ttf or .otf file doesn’t guarantee compatibility. The font’s design plays a crucial role in how well it will translate to a Cricut cut. Intricate designs with very thin lines or extremely small details might not cut cleanly, leading to broken letters or a messy final product.
Supported Font Types and Compatibility Verification
While CDS accepts .ttf and .otf files, the success of your cut depends heavily on the font’s design. Before uploading a font, it’s advisable to test it on a small-scale project. Create a simple test design using the font, cut it out, and inspect the result. Look for any breaks in the letters, uneven cuts, or other imperfections.
If the test cut is unsatisfactory, consider finding an alternative font. Many free and paid font websites offer previews, allowing you to assess the font’s suitability before downloading.
Free vs. Paid Fonts and Their Limitations
The world of fonts offers a vast array of choices, from free options readily available online to premium fonts sold by designers. While free fonts can be a great starting point, they often come with limitations. Some free fonts may have restricted licenses, preventing commercial use. Others might have simpler designs that lack the intricacy of paid fonts, limiting your creative possibilities.
Paid fonts, on the other hand, usually offer a wider range of styles, better quality, and often come with more comprehensive licenses.
However, even paid fonts aren’t immune to Cricut compatibility issues. The intricacy of the design remains the key factor. A highly detailed paid font might still present challenges in cutting, just as a simple free font might cut perfectly. The best approach is always to test your chosen font, regardless of whether it’s free or paid, before committing to a large-scale project.
Methods for Uploading Fonts to Cricut Design Space
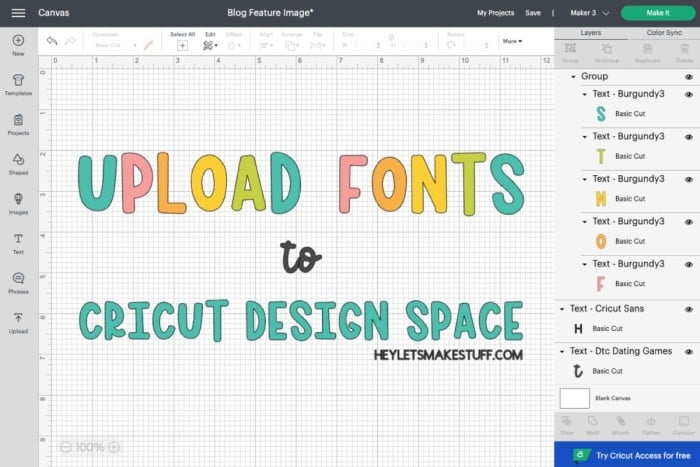
Source: heyletsmakestuff.com
Adding custom fonts to Cricut Design Space opens up a world of creative possibilities, allowing you to personalize your projects with unique typography. This process is relatively straightforward, but understanding the different font file types and the steps involved will ensure a smooth experience. Let’s explore the methods for uploading your favorite fonts.
Uploading TrueType (.ttf) Fonts
TrueType fonts are a common font format, and uploading them to Cricut Design Space is a simple process. First, make sure you have the .ttf font file downloaded to your computer. Then, follow these steps:
- Open Cricut Design Space and navigate to the “System” fonts section.
- Click the “Upload” button, usually located near the font list.
- Select “Upload Font” from the options that appear.
- Browse your computer files and select the .ttf font file you wish to upload.
- Cricut Design Space will process the font upload. This might take a few seconds depending on the font size and your internet connection.
- Once uploaded, the font will appear in your Cricut Design Space font list, ready to be used in your projects.
Uploading OpenType (.otf) Fonts
OpenType fonts (.otf) are another widely used font format. The upload process for .otf fonts is almost identical to that of .ttf fonts.
- Open Cricut Design Space and navigate to the “System” fonts section.
- Click the “Upload” button.
- Select “Upload Font.”
- Browse your computer and select the .otf font file you want to use.
- Cricut Design Space will process the upload. Again, processing time depends on the font size and your internet speed.
- After a successful upload, the font will be available in your Cricut Design Space font library.
Font File Type Upload Comparison
The process for uploading both .ttf and .otf fonts is remarkably similar. The key difference lies in the file type selected during the upload process. The table below summarizes the steps:
| Step | .ttf Font Upload | .otf Font Upload | Notes |
|---|---|---|---|
| 1 | Open Cricut Design Space and navigate to fonts. | Open Cricut Design Space and navigate to fonts. | This is the same for all font types. |
| 2 | Click “Upload” button. | Click “Upload” button. | Location of the button might vary slightly depending on the Design Space version. |
| 3 | Select “Upload Font”. | Select “Upload Font”. | This option should be clearly visible after clicking “Upload”. |
| 4 | Select .ttf file. | Select .otf file. | Ensure you select the correct file type. |
| 5 | Wait for upload to complete. | Wait for upload to complete. | Upload time depends on file size and internet connection. |
| 6 | Font appears in font list. | Font appears in font list. | The font is now ready to use in your projects. |
Troubleshooting Font Upload Issues
Uploadiing fonts to Cricut Design Space can sometimes be tricky. While the process is generally straightforward, several issues can prevent successful uploads. Understanding these common problems and their solutions will save you time and frustration. This section will guide you through identifying and resolving the most frequent font upload challenges.
Common Font Upload Errors and Solutions
Encountering errors during font uploads is unfortunately common. These errors often stem from problems with the font file itself, incorrect file formats, or issues with Cricut Design Space’s compatibility. Let’s examine some typical scenarios and their solutions. For instance, you might receive a message indicating that the font is not supported, the file is corrupted, or that the upload process has failed.
- Error: “Font Not Supported”: This usually means the font file is in an unsupported format (e.g., a font file other than .ttf or .otf). Solution: Ensure you’re using a TrueType (.ttf) or OpenType (.otf) font file. Convert the font to one of these formats if necessary using a font conversion tool.
- Error: “File Upload Failed”: This could be due to a weak internet connection, a problem with Cricut Design Space, or a corrupted font file. Solution: Check your internet connection. Restart Cricut Design Space and your computer. If the problem persists, try uploading a different font to see if the issue lies with the font file itself.
- Error: “Font File Corrupted”: This indicates that the font file is damaged and can’t be read properly. Solution: Try downloading the font again from a reliable source. If you’re using a font you already have on your computer, try copying the file to a different location before uploading.
Fixing Font File Corruption Issues
A corrupted font file is a frequent culprit behind failed uploads. The corruption could occur during download, transfer, or storage. Several steps can help diagnose and resolve this.
- Verify the Source: Download the font from a trusted website. Pirated or improperly downloaded fonts are more prone to corruption.
- Check File Size: Compare the downloaded file size to the original file size (if available). A significant discrepancy could indicate corruption.
- Use Font Verification Tools: Some specialized software can scan font files for errors and attempt repairs. While not guaranteed to fix all issues, these tools can be helpful.
- Re-download the Font: If all else fails, simply redownloading the font from a reputable source is often the most effective solution.
Font Licensing and Usage Rights
Using fonts in Cricut Design Space requires adherence to licensing agreements. Each font has specific terms governing its use, often restricting commercial use or requiring attribution. Ignoring these terms can lead to legal issues.
For example, many free fonts available online have limitations on commercial use. Using such a font to create products for sale without the proper license could result in copyright infringement. Always carefully review the font’s license before uploading and using it in your projects. Understand the distinction between personal and commercial licenses; using a font with a personal license for commercial purposes is a violation of the license agreement.
Organizing and Managing Uploaded Fonts: How To Upload Fonts To Cricut Design Space
So, you’ve successfully uploaded a bunch of fonts to Cricut Design Space – congratulations! Now comes the slightly less glamorous, but equally important, task of keeping them organized. A chaotic font library can quickly become a frustrating time-suck, hindering your creative flow. Let’s explore strategies to tame your font collection and make finding the perfect typeface a breeze.
Efficient font management in Cricut Design Space is crucial, especially as your collection grows. A well-organized library saves you precious time searching for specific fonts, reducing frustration and improving your overall design workflow. Think of it as decluttering your digital craft room – a more organized space means a more productive you!
Font Organization Systems within Cricut Design Space
Implementing a clear system for organizing your fonts directly within Cricut Design Space is key. While the software doesn’t offer built-in folder structures like some design programs, you can still create order using a naming convention. Consider using a consistent naming system that incorporates categories and s. For example, you could use “Category__FontName” (e.g., “Serif_Elegant_PlayfairDisplay”). This allows for easy searching and filtering within the Cricut Design Space font list.
Alternatively, you can use a numerical system, assigning numbers to different categories. The important thing is consistency to ensure your system remains manageable and intuitive.
Managing a Large Font Collection
As your font library expands, managing it efficiently becomes even more critical. Regularly review your uploaded fonts and delete those you rarely or never use. This keeps your list manageable and speeds up loading times. Consider creating a separate document (like a spreadsheet) outside of Cricut Design Space to keep track of your fonts, including categories, s, and download sources.
This external catalog can serve as a master list, making it easy to locate fonts even if you’ve forgotten their exact names within the Cricut Design Space interface.
Best Practices for Font Management in Cricut Design Space
Following these best practices will help you maintain a streamlined and efficient font library within Cricut Design Space, ensuring a smooth and enjoyable design process.
- Use a consistent naming convention: Employ a system that categorizes and identifies your fonts clearly (e.g., “Script_Casual_BrushScriptMT” or “SansSerif_Modern_OpenSans”).
- Regularly purge unused fonts: Delete fonts you haven’t used in a considerable period. This improves search speed and reduces clutter.
- Create an external font catalog: Maintain a spreadsheet or document outside of Cricut Design Space to track your fonts, including sources and descriptions.
- Utilize Cricut Design Space’s search function: Take advantage of the built-in search functionality to quickly locate specific fonts using s.
- Download fonts in batches: Avoid uploading one font at a time; upload in manageable groups to save time and effort.
- Back up your font collection: Regularly back up your font files to an external hard drive or cloud storage to protect against data loss.
Utilizing Uploaded Fonts in Cricut Projects
Source: pinimg.com
So, you’ve successfully uploaded your custom fonts to Cricut Design Space – fantastic! Now it’s time to put them to good use. This section will guide you through selecting, applying, and understanding how font choices impact your final Cricut creations. Remember, the right font can elevate a project from good to great!
Applying your uploaded fonts is straightforward. Once uploaded, they’ll appear in the font dropdown menu alongside Cricut’s pre-installed options. Simply select the text box in your design, choose your uploaded font from the list, and watch your project transform. Experimenting with different fonts is key to finding the perfect match for your project’s style and message.
Font Size and Style Influence on Cricut Projects
The size and style of your chosen font directly influence the final cut or print outcome. Smaller fonts might be difficult to weed or require more precision, especially with intricate designs. Conversely, excessively large fonts could exceed the cutting mat’s size or result in a design that’s too bulky for its intended purpose. Similarly, fonts with thin strokes might be prone to breaking or tearing during cutting, while bold fonts will require more material and create a more substantial final product.
For example, a delicate script font might be perfect for a wedding invitation, but would be unsuitable for a sturdy iron-on design for a child’s t-shirt. A bold sans-serif font, on the other hand, would be a better choice for the t-shirt due to its durability and readability. Consider the material you’re using and the project’s purpose when choosing font size and style.
Font Style Selection for Different Cricut Project Types
Choosing the right font is crucial for creating visually appealing and functional Cricut projects. Different font styles lend themselves to different project types.
For instance, elegant script fonts are ideal for wedding invitations, cards, and other projects requiring a touch of sophistication. Think flowing letters with subtle curves and flourishes. A playful, rounded font might be perfect for children’s crafts, adding a cheerful and approachable feel. Bold sans-serif fonts are excellent for projects that need to be easily readable from a distance, such as iron-on designs for t-shirts or tote bags.
Finally, a more structured serif font might be suitable for projects requiring a formal or classic look, such as personalized stationery or labels.
Consider these examples:
- Wedding Invitations: Elegant script fonts like Edwardian Script ITC or Playfair Display.
- Children’s Crafts: Playful fonts like Bubblegum Sans or KG Miss Kindergarten.
- T-shirts and Tote Bags: Bold sans-serif fonts like Montserrat or Bebas Neue.
- Stationery and Labels: Serif fonts like Times New Roman or Garamond.
Remember to always test your font choices on scrap material before committing to your final project. This allows you to check for any issues with cutting or weeding, ensuring a successful outcome.
Alternative Font Sources and Resources
Finding the perfect font for your Cricut projects can significantly enhance their visual appeal. While Cricut Design Space offers a selection of fonts, exploring external resources expands your creative possibilities dramatically. This section details reputable websites offering both free and commercial fonts, and guides you through the crucial step of verifying font licenses.
So you’re wondering how to upload fonts to Cricut Design Space? It’s actually pretty straightforward once you get the hang of it, but if you’re struggling with the video tutorials, check out this awesome guide on getting it on with YouTube for tips on finding the best Cricut Design Space tutorials. Mastering YouTube searches will make finding those font upload videos a breeze, and then you’ll be crafting with your favorite fonts in no time!
Choosing the right font source is paramount. Not all free fonts are created equal, and some commercial fonts may have restrictive licenses. Understanding these differences ensures you use fonts legally and ethically in your projects.
Reputable Websites for Downloading Fonts
Many websites offer a vast library of fonts, catering to diverse tastes and project needs. It’s essential to carefully evaluate each site’s reputation and the licensing terms associated with the fonts they offer. Always download fonts from trusted sources to avoid malware or copyright infringement.
| Website | Font Style Focus | License Type | Notes |
|---|---|---|---|
| Google Fonts | Wide variety, including serif, sans-serif, display, and handwriting styles | Open-source, free for commercial use | Excellent resource for a large selection of high-quality, versatile fonts. |
| DaFont | Diverse range of styles, many free options | Mix of free and commercial licenses; check individual font licenses carefully | Large selection, but requires careful review of each font’s license. |
| Creative Market | High-quality, curated fonts, often with unique styles | Commercial, paid | Excellent source for professional-grade fonts, but requires a purchase. |
| Font Squirrel | Focus on free fonts with commercial licenses | Primarily free for commercial use | A reliable source for high-quality free fonts suitable for various projects. |
Verifying Font Licensing Terms
Before downloading and using any font, meticulously review its license agreement. This is crucial to avoid legal issues and ensure your project complies with the font’s intended use. Look for information regarding:
- Commercial Use: Is the font permitted for use in commercial projects (selling products using the font)?
- Attribution: Does the license require you to credit the font creator? If so, how should you provide attribution?
- Modifications: Can you modify the font (e.g., change its weight or style)?
- Distribution: Are you allowed to redistribute the font? This is important if you’re creating and selling font bundles or templates.
- Embedding: Can you embed the font in documents or digital products you distribute?
Failure to adhere to the license terms can result in legal consequences. Always download a copy of the license and keep it for your records.
Visual Guide to Font Upload Process
Uploading custom fonts to Cricut Design Space can seem daunting, but with a clear understanding of the visual cues, the process becomes straightforward. This guide provides a step-by-step walkthrough of the visual elements you’ll encounter, ensuring a smooth font upload experience.Let’s dive into a detailed visual representation of the font upload process in Cricut Design Space. The process is largely consistent across different operating systems (Windows, macOS), though minor visual differences might exist.
Step-by-Step Visual Description of Font Upload
The font upload process begins within the Cricut Design Space interface. First, you’ll need to locate the “Upload” section, usually found within the main Design Space workspace. Finding this is the crucial first step.
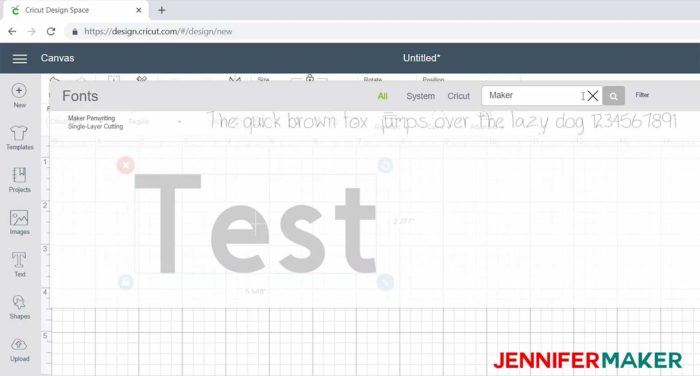
- Accessing the Font Upload Section: Look for a button or icon, often labeled “Upload,” usually situated within the “Canvas” area or the “Tools” panel. It might appear as a small upward-pointing arrow within a box, or a more explicitly labeled button. This button initiates the upload process. Clicking this button opens a new dialog box.
- The Upload Dialog Box: This box typically presents a clean, uncluttered interface. You’ll see a large area designated for file selection, often labeled “Select Image” or similar. Below this area, there might be a progress bar that will fill as your font uploads. You’ll also see an area for choosing the file type, typically limiting it to specific font file formats (like .ttf or .otf).
- Selecting the Font File: Once you click the file selection area, a standard file browser window will open on your computer. Navigate to the folder where your font file (.ttf or .otf) is saved. Select the file by clicking on it, and then click “Open” or a similar button to confirm your selection. The file name will then appear in the upload dialog box.
- The Upload Progress Bar: After selecting the font file, the upload begins. A progress bar will usually appear below the file name, visually representing the upload’s progress. This bar typically fills from left to right, indicating the percentage of completion. A numerical percentage may also be displayed alongside the progress bar.
- Confirmation of Successful Upload: Once the upload is complete, the progress bar will reach 100%, and a confirmation message will typically appear. This might simply be a checkmark icon or a text message such as “Upload Complete.” The newly uploaded font should then appear in your Cricut Design Space font list, ready for use in your projects. If an error occurs during the upload, a message will usually indicate the problem, potentially offering troubleshooting suggestions.
Advanced Font Techniques in Cricut Design Space
Source: jennifermaker.com
Mastering Cricut Design Space goes beyond simply uploading fonts; it involves understanding how to manipulate them for optimal design results. This section explores advanced techniques to elevate your projects from simple text to visually stunning creations. We’ll delve into font variations and the art of combining different typefaces for maximum impact.
Font Variations and Their Impact
Utilizing font variations like bold, italic, and even shadow effects can significantly enhance your designs. A simple change from a regular font to a bold one can add emphasis to a key word or phrase, drawing the viewer’s eye. Similarly, italicizing text can create a sense of elegance or informality, depending on the context. These variations allow for subtle yet powerful adjustments to the overall aesthetic of your project.
For example, using a bold font for a brand name on a t-shirt design creates a strong visual impact, while italicizing a product description on a label might suggest a more delicate or refined product. Experimenting with different combinations of variations allows you to fine-tune the mood and message of your design.
Combining Different Fonts for Visual Appeal
The key to successful font pairing lies in understanding the relationship between different typefaces. Combining fonts that are visually compatible creates a harmonious and pleasing aesthetic, while clashing fonts can detract from the overall design. Generally, it’s best to pair fonts that share similar characteristics, such as serif with serif or sans-serif with sans-serif, but with variations in weight or style.
For instance, a classic serif font like Times New Roman paired with a modern sans-serif like Arial can create a sophisticated yet contemporary look. Conversely, pairing a playful script font with a bold sans-serif can result in a fun and energetic design. The goal is to create visual balance and hierarchy, ensuring that different text elements are easily distinguishable and contribute to the overall message.
Examples of Effective Font Pairing and Usage, How to upload fonts to cricut design space
Consider a wedding invitation design. A classic serif font could be used for the main text (names, date, time), providing a sense of formality and elegance. A more decorative script font might be used for the couple’s names, adding a touch of personalization and romance. A simpler sans-serif font could then be used for smaller details like the location and RSVP information.
This combination creates a balanced and visually appealing design. Another example could be a children’s birthday party invitation. A playful, rounded sans-serif font could be used for the main text, while a fun, slightly more decorative font might be used for the child’s name or a key phrase like “Happy Birthday!”. This demonstrates how font choices directly impact the overall feel and message of a project.
Experimentation and careful consideration of the project’s purpose are key to successful font pairing.
Conclusive Thoughts
So, there you have it! Mastering how to upload fonts to Cricut Design Space opens up a whole new level of customization for your projects. Remember to always check font licenses, organize your fonts for easy access, and experiment with different font pairings to achieve the perfect look for your creations. Happy crafting!
FAQs
Can I upload any font to Cricut Design Space?
No, Cricut Design Space supports TrueType (.ttf) and OpenType (.otf) fonts, but not all fonts within those formats are compatible. Some fonts may have limitations depending on their design.
What if my uploaded font looks blurry or distorted?
This often indicates a problem with the font file itself. Try downloading it again from a reputable source. Also, check the font size in your design; excessively small fonts can appear blurry.
Where can I find free fonts for Cricut?
Many websites offer free fonts, but always check the license to ensure they’re permitted for commercial use if you plan to sell your Cricut creations. Google Fonts is a great starting point.
My font isn’t showing up in Cricut Design Space after uploading. What should I do?
Restart Cricut Design Space. If the problem persists, try uploading the font again, ensuring the file isn’t corrupted. Sometimes, a simple computer restart helps too.