


The landscape of modern digital cinematography is currently witnessing a paradoxical shift. While camera manufacturers continue to push the boundaries of resolution with 8K sensors and high dynamic range capabilities, a significant segment of the creative community is looking backward. Much like the resurgence of the VHS aesthetic several years ago, the "Mini DV" look has emerged as a dominant trend in music videos, fashion advertising, and social media content. Often categorized under the broader umbrella of "Lo-Fi" (low fidelity) aesthetics, the Mini DV look captures a specific era of digital history—the transition from analog tape to digital storage that defined the late 1990s and early 2000s.
The appeal of Mini DV lies in its imperfections: the harsh digital sharpening, the "stair-stepping" aliasing on diagonal lines, and the specific way it handles color fringing. For many Gen Z and Millennial creators, these visual artifacts evoke a sense of "digital nostalgia" for the camcorder era. To meet the demand for this specific aesthetic, digital artists are increasingly utilizing Adobe After Effects to simulate the technical limitations of early 2000s hardware. This guide provides a comprehensive technical breakdown and chronological workflow for recreating the authentic Mini DV look using modern high-definition footage.

The Historical Context of the Mini DV Format
To accurately recreate the Mini DV look, one must first understand the technical constraints of the original medium. Launched in 1995, the Mini DV (Digital Video) format was a revolutionary step in filmmaking. It brought digital recording to the consumer and prosumer markets, offering a resolution of 720×480 pixels (for NTSC) or 720×576 (for PAL). Unlike modern cameras that record to solid-state drives, Mini DV recorded digital data onto small magnetic tapes.
The "look" of Mini DV is defined by several factors. First, the sensors in these cameras were typically much smaller than modern full-frame sensors, leading to a deeper depth of field and distinct noise patterns. Second, the compression used (DV25) had a fixed bitrate of 25 Mbps and a color sampling of 4:1:1 (NTSC) or 4:2:0 (PAL). This resulted in "chroma subsampling" artifacts, where color information was less sharp than the luminance information. Finally, the internal processing of these cameras often applied aggressive "in-camera sharpening" to make the standard-definition image appear clearer, which created the characteristic haloing and aliasing that modern creators now seek to emulate.
Chronological Workflow: Recreating the Mini DV Aesthetic
The process of simulating this vintage digital look requires a multi-stage approach in Adobe After Effects. The goal is to systematically degrade the high-quality modern footage to match the technical specifications of early digital tape.
Phase 1: Establishing the Low-Resolution Foundation
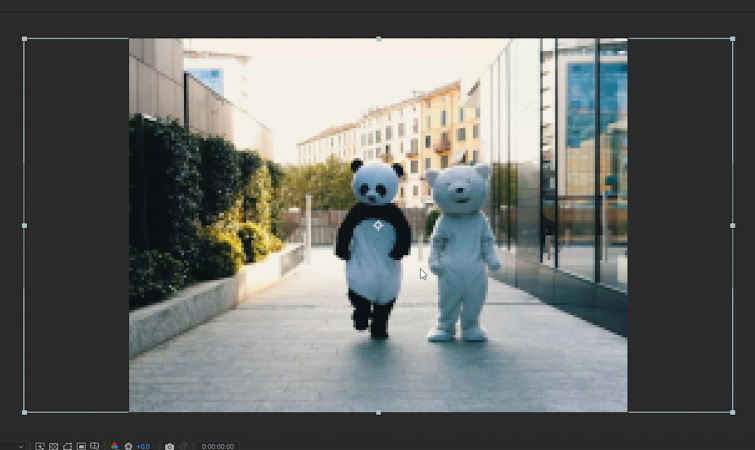
The most critical step in the process is the "Resolution Crush." Modern footage is typically shot in 1080p (1920×1080) or 4K (3840×2160). Mini DV, however, operated on a 4:3 aspect ratio with significantly fewer pixels.
- Composition Setup: Begin by creating a new composition titled Mini DV Comp. To simulate the low-resolution feel while maintaining a 4:3 aspect ratio, set the composition dimensions to 200 px x 150 px.
- Footage Integration: Import your high-definition footage into this composition. Because the composition is so small, the footage will likely be oversized.
- Scaling to Fit: Select the footage layer and navigate to Layer > Transform > Fit to Comp Height. This forces the high-resolution image into the 150-pixel vertical space.
- Observation: At this stage, the image will appear extremely pixelated. This is intentional. By forcing the software to discard the majority of the pixel data, you are creating the "aliasing" (the jagged edges) that is characteristic of early digital sensors.
Phase 2: Upscaling and Artifact Generation
Once the resolution has been crushed, the next step is to bring that low-resolution image back into a modern workspace to emphasize the artifacts.
- Main Composition Setup: Create a new composition titled Main Comp with standard high-definition settings: 1920 px x 1080 px.
- Nesting: Drag the Mini DV Comp into the Main Comp.
- The Upscale: Select the Mini DV Comp layer and again navigate to Layer > Transform > Fit to Comp Height.
- Visual Result: By scaling the 150-pixel-high image back up to 1080 pixels, After Effects creates "stair-stepping" artifacts on horizontal and diagonal lines. This is known as aliasing. You will also notice a distinct "flicker" on the edges of objects during movement, which mimics the way older interlace-based systems handled motion.
Enhancing the "Nostalgic" Visual Profile
While the resolution adjustment provides the structural foundation of the look, the "feel" of the 1990s and early 2000s comes from color and edge processing. Early digital cameras had limited dynamic range, meaning they struggled with high-contrast scenes, often "blowing out" highlights or crushing blacks.

Color Grading for Harshness
To replicate the sensor limitations of the era, the footage needs to look "harsh" rather than cinematic.
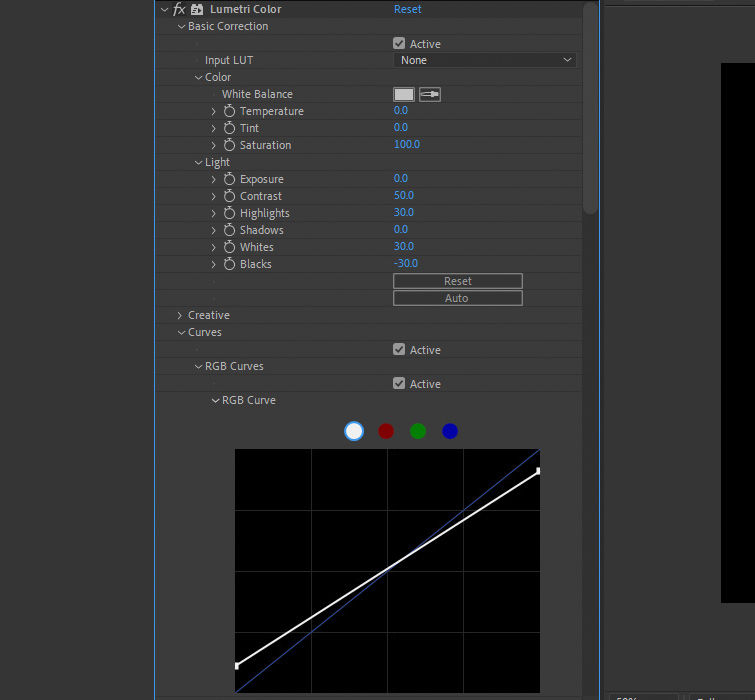
- Lumetri Color Application: In the Main Comp, apply the Lumetri Color effect to the Mini DV Comp layer.
- Contrast Adjustments: Increase the Contrast to approximately 50. Raise the Highlights and Whites to 30, and drop the Blacks to -30. This creates a "cheap" digital look where the mid-tones are compressed, and the extremes are exaggerated.
- Curve Tuning: To further simulate the limited latitude of early CCD sensors, adjust the White and Black Points on the RGB Curve. By slightly lifting the black point and lowering the white point, you can create a "washed out" yet high-contrast look that is synonymous with home movies from the year 2000.
Simulating Chromatic Abberation and Fringing
Mini DV footage often suffered from color "bleeding," particularly in the blue and red channels, due to the way the DV25 codec compressed color data.
- Channel Blur: Apply the Channel Blur effect to the layer.
- Blue Channel Manipulation: Set the Blue Blurriness value to 3. Because the human eye is less sensitive to blue light, early digital compression often discarded more blue data. Blurring this channel creates a subtle "halo" of color around high-contrast edges, a hallmark of the Lo-Fi aesthetic.
Punching Up Digital Sharpening
The final touch in the Mini DV transformation is the application of "unsharp masking." In an era before high-definition, cameras used software algorithms to artificially sharpen the edges of objects.
- Unsharp Mask: Apply the Unsharp Mask effect to your layer.
- Settings: Set the Amount to 150 and the Radius to 2.
- Impact: This effect adds a white "glow" or halo to dark edges and a dark "line" to light edges. It makes the footage look "sharper" in a low-quality, digital way, emphasizing the aliasing created in the first phase of the workflow.
Industry Analysis: The Cultural Resurgence of Lo-Fi
The move toward Mini DV and VHS aesthetics is more than just a passing fad; it represents a broader cultural reaction against the "perfect" digital image. In a professional analysis of current media trends, several factors contribute to this phenomenon.
The Authenticity Factor
In an age of AI-generated imagery and hyper-processed mobile photography, the imperfections of Mini DV feel "authentic" to many viewers. This look is frequently used by luxury fashion brands like Gucci and Balenciaga in their social media campaigns to create a "behind-the-scenes" or "documentary" feel that resonates with younger demographics who value raw, unpolished content.
The 20-Year Cycle
Fashion and design trends famously operate on a 20-year cycle. Just as the 1970s were popular in the 1990s, the aesthetics of the late 90s and early 2000s (often called "Y2K style") have returned to the forefront of popular culture. Mini DV was the primary medium of that era, making it the visual language of choice for creators looking to tap into that specific era of nostalgia.

Technical Accessibility
One of the reasons this look has proliferated is the ease with which it can be replicated. As shown in the tutorial, the look does not require expensive plugins or high-end hardware; it simply requires an understanding of how to manipulate resolution and color within standard software like After Effects or Premiere Pro.
Conclusion and Broader Implications
The ability to recreate the Mini DV look in After Effects allows modern filmmakers to bridge the gap between high-end production and retro aesthetics. By following the chronological steps of downscaling, color manipulation, and artificial sharpening, creators can produce content that feels historically grounded while maintaining the flexibility of a modern digital workflow.
As the industry continues to evolve, the "Lo-Fi" movement suggests that resolution is not the only metric of quality. Sometimes, the most effective way to tell a story or evoke an emotion is to embrace the glitches, the noise, and the pixels of the past. For those looking to expand their retro toolkit further, similar techniques can be applied in Premiere Pro to achieve the VHS look, often utilizing presets that simulate magnetic tape warpage and analog static. In the current creative economy, mastering these "vintage" digital techniques is becoming as essential as knowing how to shoot in 8K.