

In the high-stakes environment of professional digital cinematography, the integrity of color representation remains a primary metric for production quality. One of the most persistent challenges faced by editors and colorists is the presence of unwanted color casts, particularly yellow or orange tints that settle into the white areas of a frame. These chromatic inaccuracies often stem from improper in-camera white balance settings, fluctuating color temperatures in mixed-lighting environments, or the use of lower-quality artificial lighting sources with poor Color Rendering Index (CRI) ratings. While global white balance adjustments are a standard first step in post-production, they often fail to isolate specific problematic hues without degrading the overall color harmony of the shot. Consequently, industry professionals are increasingly turning to selective color manipulation techniques to achieve "cleaner" whites and more naturalistic imagery.
The Technical Complexity of Color Inaccuracy
The presence of a yellow or orange tint on objects that should be neutrally white—such as paper, clothing, or snow—is more than a cosmetic flaw; it is a technical failure that can break the viewer’s immersion. In digital imaging, "white" is the balanced combination of Red, Green, and Blue (RGB) channels at high luminance levels. When a camera’s sensor is calibrated to a color temperature that does not match the ambient light—for instance, shooting under tungsten light (approx. 3200K) while the camera is set to daylight (approx. 5600K)—the resulting footage will lean heavily toward the warmer end of the spectrum.

Standard corrective measures involve shifting the "Temperature" and "Tint" sliders in a Non-Linear Editor (NLE). However, these are global adjustments. If an editor attempts to "cool down" a shot to fix yellowed whites, they may inadvertently turn the shadows blue or make skin tones appear sickly and desaturated. This creates a secondary problem where the fix is as problematic as the original issue. To resolve this, a more surgical approach is required, focusing specifically on the saturation levels of the offending hues.
A Procedural Shift: The Lumetri Color Workflow
Adobe Premiere Pro’s Lumetri Color engine has become the industry standard for integrated color grading, evolving significantly since its introduction in the Creative Cloud 2015 update. Within this toolset, the "Curves" tab offers a sophisticated array of hue-based controls that allow for the isolation of specific colors without affecting the rest of the image. The most effective tool for removing yellow casts is the Hue vs. Saturation (Hue vs. Sat) curve.
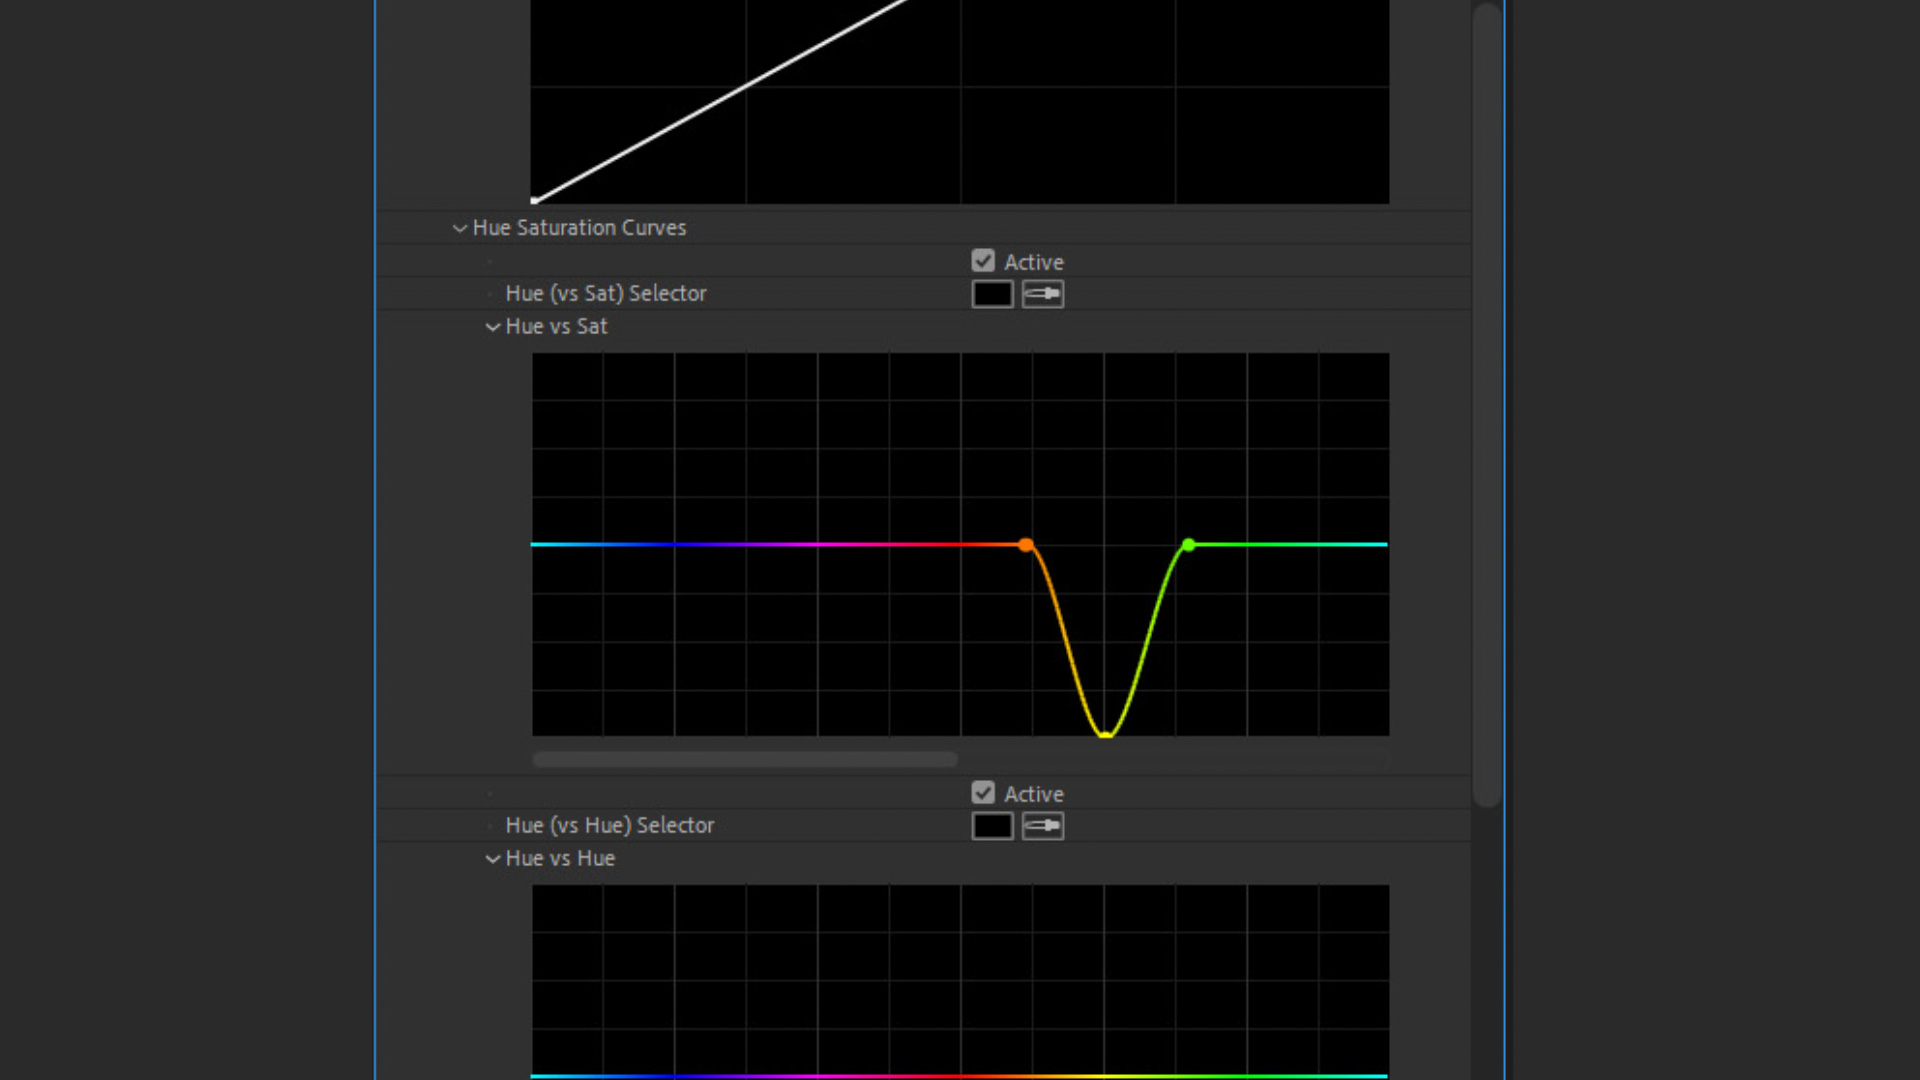
The Hue vs. Sat curve is represented as a horizontal "rainbow" line. By manipulating this line, an editor can choose a specific color (the Hue) and increase or decrease its intensity (the Saturation). The procedural workflow for cleaning yellowed whites involves a three-point isolation technique. First, the editor identifies the yellow region of the curve. By placing "anchor points" on the neighboring orange and green sections, the editor ensures that only the yellow frequencies are affected. Once these boundaries are set, the central yellow point is dragged downward toward the bottom of the graph.

This action performs a selective desaturation. Because "pure white" in a digital sense should ideally have zero saturation, removing the saturation from the yellow hues effectively "cleans" the white areas of the footage. This method is particularly valued because it preserves the luminance (brightness) of the whites while stripping away the unwanted pigment, resulting in a crisp, professional look that global temperature shifts cannot replicate.
Chronology of Color Grading Evolution in NLEs
The ability to perform such precise color surgery within a standard editing timeline marks a significant shift in the history of post-production.
- The Early Digital Era (1990s-2000s): Color correction was largely limited to basic brightness, contrast, and RGB levels. Professional grading required expensive, dedicated hardware and "round-tripping" to specialized suites.
- The Rise of Specialized Software (2010s): Software like DaVinci Resolve began to gain traction, offering node-based workflows and advanced curve controls. NLEs like Premiere Pro and Final Cut Pro were still considered "correction" tools rather than "grading" tools.
- The Integration Phase (2015-Present): Adobe integrated the SpeedGrade engine into Premiere Pro as the Lumetri Color panel. This allowed editors to perform high-level color surgery—like the Hue vs. Saturation adjustments discussed here—without leaving their primary timeline.
- Modern AI-Assisted Grading (2022-Future): The introduction of Auto-Tone and AI-driven color matching has simplified the initial stages of grading, but manual curve manipulation remains the gold standard for precision work and creative intent.
Industry Data and Market Implications
The demand for high-fidelity color correction has surged alongside the growth of high-definition streaming platforms. According to industry reports, video content now accounts for over 80% of all internet traffic. As platforms like YouTube and Vimeo support 4K and HDR (High Dynamic Range) content, the "visual literacy" of the average viewer has increased. Footage that appears "muddy" or "yellowed" is often perceived as amateurish, impacting brand credibility for corporate creators and engagement rates for independent influencers.
Market data from the post-production sector indicates that "time-to-delivery" is the most critical metric for modern editing houses. Techniques that allow for "surgical" fixes—like removing a yellow cast in under sixty seconds using curves—provide a competitive advantage over workflows that require complex masking or external grading. Furthermore, with the rise of 10-bit and 12-bit recording formats in mid-range cameras (such as the Sony Alpha or Blackmagic Pocket Cinema lines), editors have more "chroma data" to work with, making these curve-based adjustments smoother and less prone to digital artifacts or "banding."
Broader Impact on Cinematography and Real-World Applications
The implications of these techniques extend beyond the editing bay and into the field of cinematography. Knowing that certain color casts can be easily remediated in post-production allows cinematographers more flexibility on set. For example, when filming in a "run-and-gun" documentary style where lighting cannot be controlled, a cinematographer might prioritize capturing the action over achieving a perfect white balance.
However, industry veterans caution against a "fix it in post" mentality. A brief fact-based analysis suggests that while the Hue vs. Saturation method is highly effective for correcting whites, it can have unintended consequences if the shot contains other yellow elements that need to remain vibrant—such as a yellow taxi, flowers, or specific gold branding. In such cases, the editor must combine curve adjustments with "Secondary HSL" masks to protect the desired colors while cleaning the whites.

Official Responses and Professional Consensus
Leading colorists from organizations such as the International Colorist Academy (ICA) emphasize that color grading is both a corrective and a narrative tool. The consensus among professionals is that "clean whites" serve as a psychological anchor for the viewer. When the whites in a frame are neutral, the human eye perceives the rest of the colors as more accurate.
"The goal of a colorist is to manage the viewer’s perception," says one senior editor at a major New York post-production house. "By using the Hue vs. Sat curve to strip the yellow out of a white shirt or a wall, you aren’t just fixing a mistake; you are resetting the viewer’s internal compass for what ‘real’ looks like in that scene."
Adobe’s own documentation and tutorial releases continue to highlight the Curves panel as a priority for users. The company’s focus on "democratizing" professional tools has led to a generation of editors who are as proficient in color science as they are in narrative pacing.

Conclusion: The Future of Color Fidelity
As digital imaging technology continues to advance, the line between "entry-level" and "professional" footage continues to blur. The ability to identify and rectify subtle issues like yellow color casts is a hallmark of a sophisticated workflow. By leveraging the Hue vs. Saturation curves within the Lumetri Color panel, editors can ensure their footage meets the rigorous standards of modern broadcasting and digital cinema.
While the technical steps—creating anchor points and reducing saturation—are simple to execute, their impact on the final output is profound. In an era where visual content is the dominant form of global communication, the pursuit of cleaner, more accurate, and more professional-looking footage remains a vital endeavor for creators across all sectors of the media industry. The shift toward these precise, curve-based corrections represents a broader maturation of the digital editing craft, moving away from broad, destructive changes and toward a philosophy of subtle, targeted enhancement.