

The pursuit of visual perfection in digital cinematography often encounters a recurring technical hurdle: the presence of unwanted color casts in the highlights of a frame. In professional video production, white elements—such as snow, clothing, or studio backgrounds—frequently absorb yellow or orange tints, a phenomenon typically caused by an incorrect white balance setting during the acquisition phase or the interplay of mixed lighting temperatures. While global color temperature adjustments are the standard first line of defense, they often fail to isolate specific problematic hues without degrading the integrity of the entire image. To address this, industry professionals are increasingly turning to targeted saturation manipulation within Adobe Premiere Pro’s Lumetri Color engine to achieve pristine, "clean" whites that maintain a natural aesthetic.
The Technical Dilemma of Global White Balance
In the field of digital imaging, white balance is the process of removing unrealistic color casts so that objects which appear white in person are rendered white in the final recording. However, cameras often struggle with "Auto White Balance" (AWB) in complex environments, such as rooms with both tungsten and daylight sources, or during the "golden hour" when the sun’s low angle introduces heavy orange frequencies.

When a colorist attempts to fix these issues using the standard "Temperature" and "Tint" sliders, the results can be frustratingly imprecise. Shifting the temperature toward the blue end of the spectrum to neutralize yellow may inadvertently turn the shadows blue or make skin tones appear sickly and desaturated. This "global" approach lacks the surgical precision required for high-end commercial or narrative work. Consequently, the industry has shifted toward a "selective color" methodology, utilizing Hue versus Saturation (Hue vs Sat) curves to isolate and neutralize only the problematic yellow and orange frequencies.
A Chronological Methodology for Targeted Color Correction
The process of refining whites through targeted desaturation follows a specific technical workflow within Adobe Premiere Pro. This methodology is designed to preserve the vibrancy of the overall image while stripping away the "muddy" yellow tint from the highlights.
Step 1: Initialization of the Lumetri Color Engine
The workflow begins with the application of the Lumetri Color effect to the selected clip on the timeline. Lumetri Color, which integrated the advanced technology of Adobe’s defunct SpeedGrade software, serves as the primary grading suite for editors. Once the effect is active, the operator must navigate to the "Curves" tab, bypassing the Basic Correction tools that offer only global shifts.

Step 2: Isolating Hues via the Hue vs Sat Curve
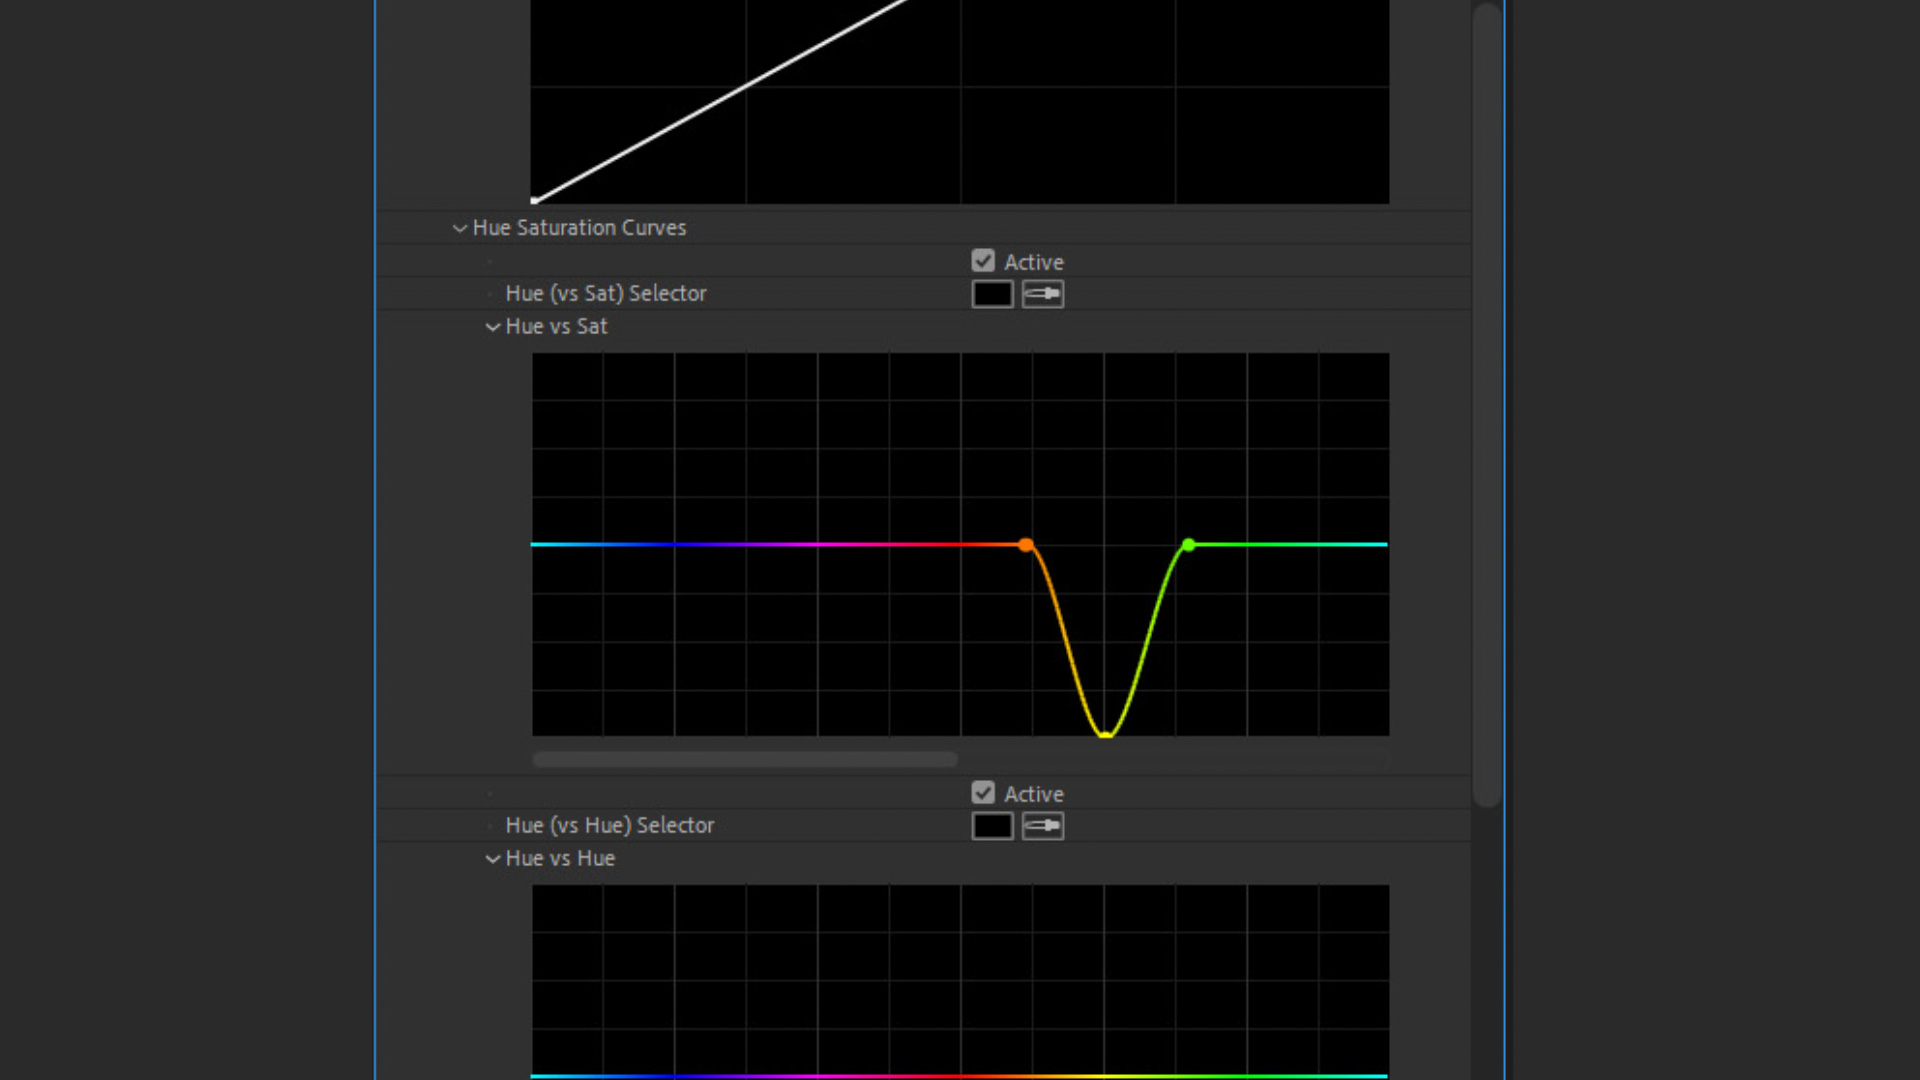
The Hue vs Sat curve is represented as a horizontal rainbow spectrum. To manipulate the image without affecting the entire color gamut, the editor must set "anchor points." By clicking on the line, three distinct points are created in the Orange, Yellow, and Green sectors. These points are critical; the Orange and Green points act as boundaries, ensuring that any adjustments made to the Yellow point do not "bleed" into the red skin tones or the blue sky.
Step 3: Executing the Desaturation Shift
The core of the correction involves dragging the center (Yellow) point downward. This action specifically reduces the saturation of any pixels falling within that narrow yellow frequency. Depending on the severity of the color cast, the point may be lowered halfway or entirely to the bottom of the graph. The visual result is an immediate "cleaning" of the white areas, which lose their sickly yellow tint and return to a neutral, high-fidelity state.
Case Studies in Applied Color Science
To understand the broader implications of this technique, one must examine its application in different shooting environments.
In a controlled indoor environment—for instance, a macro shot of a person pouring sugar into a glass—the presence of yellow light can make the sugar appear unappetizing or the glass appear aged. By applying the Hue vs Sat adjustment, the sugar regains its crystalline, pure white appearance, which is essential for product videography where brand perception is tied to visual cleanliness.
In outdoor scenarios, such as white horses running on a beach at sunrise, the natural environment introduces heavy orange and yellow light. While the warmth of a sunrise is often desirable, it can "bury" the subjects if their white coats become indistinguishable from the sand or the morning haze. By targeting the yellow and orange curves, a colorist can maintain the beautiful warmth of the sky (the reds and deep oranges) while stripping the distracting yellow tint from the horses’ coats, allowing the subjects to "pop" against the background.
Industry Analysis: The Psychology of "Clean" Whites
The demand for cleaner whites is not merely an aesthetic preference; it is rooted in the psychology of visual communication. In marketing and broadcast journalism, "pure" whites are associated with professionalism, hygiene, and high production value. According to color theory data, images with neutral whites are perceived as having higher contrast and clarity, even if the actual luminance values remain unchanged.

Furthermore, the rise of High Dynamic Range (HDR) displays has made color accuracy more critical than ever. In an HDR workflow, a yellow tint in the highlights is significantly more noticeable to the viewer than in standard definition. As viewers transition to OLED and Mini-LED screens capable of intense brightness, the "cleanliness" of those bright pixels determines the perceived quality of the content.
Broader Implications for Post-Production Pipelines
The shift toward curve-based corrections represents a broader trend in the democratization of high-end post-production tools. Techniques that were once the exclusive domain of dedicated color grading suites like DaVinci Resolve are now standard features in non-linear editors (NLEs) like Premiere Pro.
- Efficiency in Turnaround: By mastering curve-based fixes, editors can bypass the need for round-tripping footage to external grading software, significantly reducing post-production timelines for fast-turnaround news and social media content.
- Rescue of "Unusable" Footage: This technique provides a safety net for independent filmmakers who may not have had the budget for a professional lighting crew or a dedicated DIT (Digital Imaging Technician) on set to manage white balance.
- Preservation of Skin Tones: Perhaps the most significant implication is the ability to fix whites without destroying the "warmth" of human skin. Because skin tones primarily reside in the red and orange-red frequencies, the use of anchor points in the Hue vs Sat curve allows for the removal of yellow highlights while keeping the subject looking healthy and natural.
Expert Responses and Industry Standards
While Adobe does not release specific internal data on tool usage, community feedback from platforms like the American Society of Cinematographers (ASC) and various post-production forums indicates that "surgical" color grading is now the expected standard. Professional colorists often note that the "Temperature" slider is a "blunt instrument," whereas curves are "scalpels."

Industry analysts suggest that as AI-driven color correction tools continue to evolve, they will likely adopt these curve-based methodologies as their foundational logic. Automated "Auto-White Balance" features in future software updates are expected to move away from global shifts and toward the localized saturation mapping described in this methodology.
Conclusion: The Future of Color Accuracy
As the digital landscape becomes increasingly saturated with high-quality video content, the ability to distinguish one’s work through technical precision becomes a vital competitive advantage. Achieving cleaner whites through the manipulation of Lumetri Color curves is a prime example of how a nuanced understanding of color science can elevate a project from "amateur" to "cinematic."
By isolating the yellow and orange frequencies that plague highlights, editors can ensure their footage remains vibrant, professional, and true to life. This technique serves as a cornerstone of modern digital intermediate workflows, proving that in the world of high-definition storytelling, the most impactful changes are often found in the most subtle adjustments of the color spectrum. For the modern creator, mastering the Hue vs Sat curve is no longer an optional skill—it is a fundamental requirement for delivering broadcast-ready visuals in an era of unprecedented visual scrutiny.