

The relentless cycle of digital nostalgia has officially pushed past the warm, analog glow of 1980s VHS tapes and landed squarely in the early-2000s digital realm: Mini DV. Once the cutting-edge consumer format that documented millennial childhoods, family vacations, and early skate videos, Mini DV footage is experiencing a massive resurgence. Today’s filmmakers, music video directors, and content creators are actively seeking out the distinct "LoFi" characteristics of standard-definition digital tape. Rather than hunting down aging, depreciated camcorders and fragile tapes on the secondhand market, visual effects artists are increasingly turning to digital emulation techniques to replicate this specific aesthetic directly inside modern post-production suites like Adobe After Effects.
The fascination with retro digital aesthetics reflects a broader cultural fatigue with hyper-polished, ultra-high-definition 4K and 8K imagery. As smartphone sensors and cinema cameras capture clinical, flawless details, creators are finding that raw perfection often lacks character. The artifacts of early digital video—such as compression macroblocks, pixelation, color fringing, and jagged stair-stepping edges—have transformed from technical limitations into sought-after artistic choices. This tutorial-driven trend bridges the gap between historical media formats and contemporary digital workflows, offering an accessible pathway for editors to inject organic texture and authenticity into their projects.
Understanding the Anatomy of Mini DV Footage
To successfully fake the look of a Mini DV tape, an artist must first understand the technical specifications that defined the medium. Introduced in 1995 by a consortium of major electronics manufacturers, the Mini DV format recorded digital video onto small magnetic cassettes. Despite being a digital format—contrary to analog VHS—Mini DV was constrained by the technological limitations of its era.

The format operated on a 4:3 aspect ratio with a native resolution of 720×480 pixels for NTSC regions (or 720×576 for PAL). It utilized a lossy compression scheme (DV codec) with 5:to-1 color subsampling (specifically 4:1:1 for NTSC), which resulted in lower color resolution and noticeable edge artifacts. When modern high-definition or 4K footage is scaled down to mimic this low-resolution environment and subsequently blown back up to fit contemporary 1080p or 4K timelines, distinct visual anomalies occur. These include heavy aliasing on diagonal and horizontal lines, edge flickering, and a harsh, digital contrast profile that filmmakers are now laboring to recreate through digital manipulation.
Step-by-Step Guide: Building the Mini DV Pipeline in After Effects
Recreating these artifacts digitally requires a specific multi-step compositing workflow. By isolating the footage within a low-resolution pre-composition before scaling it into a high-definition master timeline, artists can force After Effects to generate authentic pixelation and aliasing naturally.
Setting Up the Low-Resolution Proxy Composition
The foundation of the Mini DV look relies on drastically reducing pixel density. To begin the process within Adobe After Effects, create a new composition and designate it as the Mini DV Comp. Adjust the composition dimensions to 200 pixels by 150 pixels. This precise sizing maintains the classic 4:3 aspect ratio associated with standard-definition DV camcorders.
Next, import your desired high-definition source footage into this new composition. Because the source footage will inevitably be much larger than the 200×150 canvas, it must be scaled down. An efficient method for achieving this is to select the footage layer, navigate the top menu to Layer, select Transform, and click Fit to Comp Height. This action automatically scales the video down to fit the diminutive frame.
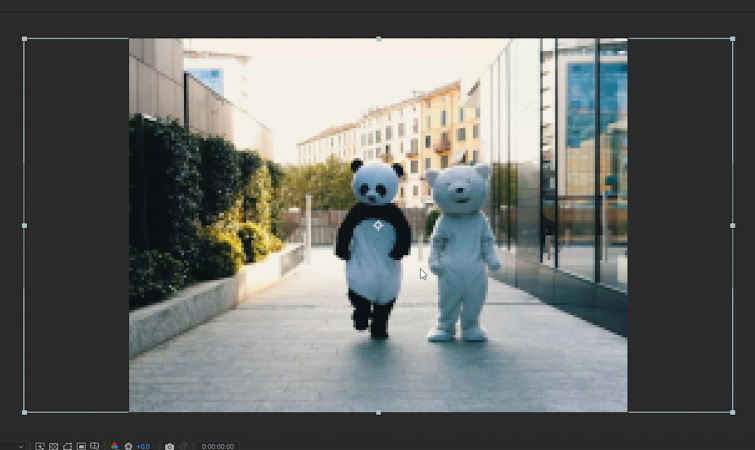
At this stage, previewing the composition will reveal an image that is heavily pixelated and virtually unwatchable by modern standards. However, this extreme degradation is a necessary first step; these compressed pixels will serve as the raw data for the subsequent scaling phase.
Integrating into the Master Timeline and Generating Aliasing
Once the low-resolution foundation is established, create a second composition titled Main Comp, setting its dimensions to a standard 1920 pixels by 1080 pixels (Full HD). Drag and drop the Mini DV Comp from your project panel into the newly created Main Comp.
Because the Mini DV Comp is currently tiny relative to the 1080p workspace, it must be scaled up to fill the frame. Select the Mini DV Comp layer, navigate once more to Layer > Transform > Fit to Comp Height, and apply the transformation. The low-resolution composition will now expand to fill the 1080p screen.
Upon inspection, the footage will exhibit the signature flaws of early digital video. Chief among these is severe aliasing—visible as prominent "stair-stepping" artifacts along straight lines, sharp angles, and high-contrast edges. Additionally, viewers will notice persistent edge flickering, replicating the unstable pixel grid of early digital sensors and tape readers.

Enhancing and Exaggerating the Nostalgic Look
With the structural artifacts in place, the next phase involves pushing the color and optical characteristics to evoke the specific visual memory of 1990s and 2000s consumer recordings. Mini DV tapes were rarely color-graded with cinematic subtlety; instead, they featured harsh, punchy contrast and distinct chromatic aberrations caused by consumer-grade camera lenses.
Applying Harsh Contrast Adjustments
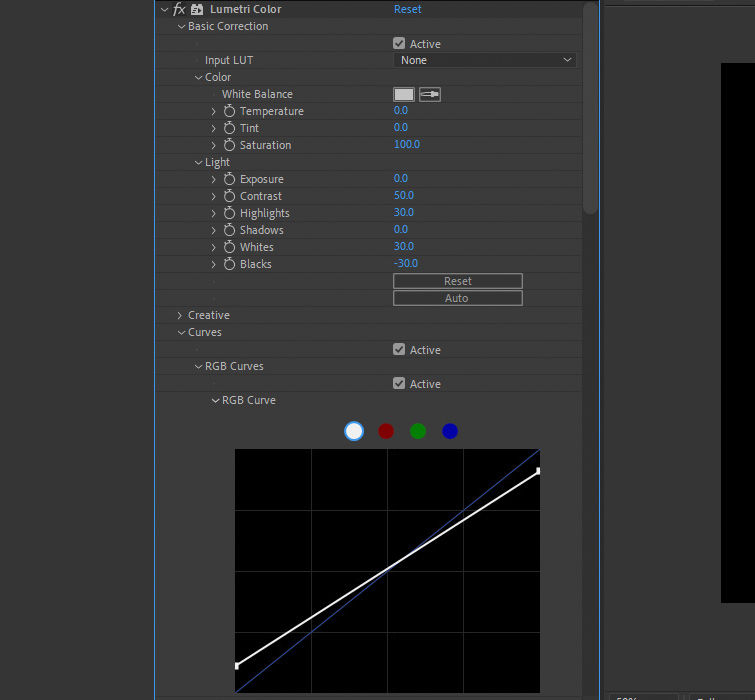
To emulate the exposure characteristics of consumer camcorders, select the Mini DV Comp within the Main Comp timeline and apply the Lumetri Color effect. Consumer tape formats typically struggled with dynamic range, leading to blown-out highlights and crushed, murky shadows.
To mimic this, adjust the grading parameters to create a decidedly harsh, contrast-heavy image. Set the Contrast parameter to 50, Highlights to 30, and Whites to 30, while pulling the Blacks down to -30. For even finer control over the tonal range, editors can manipulate the White and Black points directly within the RGB Curve interface, ensuring the midtones pop while the extremities of the exposure scale clip aggressively.
Introducing Chromatic Aberration with Channel Blur
Consumer-grade lenses attached to early DV cameras suffered from optical imperfections, frequently resulting in color fringing where light wavelengths failed to focus on the exact same point on the sensor. This phenomenon can be digitally simulated using After Effects’ Channel Blur effect.
Apply the Channel Blur effect to the Mini DV Comp layer. Locate the Blue Blurriness parameter and set its value to 3. Leaving the red and green channels sharp while diffusing the blue channel introduces a subtle, authentic vintage color fringe along high-contrast boundaries, instantly selling the illusion of a cheap optical assembly.
Sharpening Artifacts with Unsharp Mask
To finalize the emulation, the footage requires an extra layer of textural harshness. Apply the Unsharp Mask effect to accentuate the digital edges and aliasing introduced during the initial downscaling phase.
Configure the Amount parameter to 150 and the Radius parameter to 2. These values can be tweaked dynamically depending on the resolution and detail level of the underlying source footage. The Unsharp Mask deepens the digital halos and reinforces the aggressive pixel boundaries characteristic of early digital compression codecs.
Once this node tree is established, the template functions as a reusable asset. Editors can easily swap out the source footage inside the Mini DV Comp to instantly apply the complete retro treatment to an entire project’s worth of B-roll or narrative scenes.

Broader Cultural Implications and Industry Trends
The democratization of retro aesthetics through digital tools highlights a broader shift in contemporary media consumption. As high-end production gear becomes increasingly accessible to independent creators via smartphones and mirrorless cameras, technical perfection has lost its exclusivity. Consequently, imperfection has been commodified as a marker of authenticity, intimacy, and artistic intentionality.
In the music video, fashion, and independent film sectors, adopting formats like Mini DV and VHS serves as a narrative shorthand for memory, youth, and unvarnished realism. By reverse-engineering the technological limitations of the past within software ecosystems like Adobe After Effects, modern artists bypass the logistical hurdles of maintaining decaying analog and early digital hardware while retaining total control over the artistic output. As long as audiences continue to associate grain, pixelation, and chromatic aberration with emotional sincerity, the demand for digital emulation tutorials and workflows will remain a staple of modern post-production education.